
Event Driven Architecture With Azure Container Apps
In this blog, we will build an event driven architecture using Azure Blob Storage, Event Grid, and Container App Job. The code shown in this blog can be found in the GitHub samples directory samples/blob-event-grid-container-app.
What are we going to build
We’re going to build a solution that processes files uploaded by a user. A user uploads a file and is later processed by a job. One of the non-technical requirements is to build a solution that can handle hundreds of file uploads per second.
In order to meet these requirements, the solution will be composed of the following components.
- Azure Blob Storage
- Azure Event Grid
- Azure Container App Job
We will use Azure Event Grid to decouple the Azure Blob Storage container from the Azure Container App Job. The container app job will be able to scale independently of the Azure Blob Storage container.
Azure Container Apps Job is a new service that allows you to run containerized tasks. The service is designed to run short lived jobs that can be scaled out to meet demand. The service is designed to be event driven.
The following diagram shows the architecture of the solution.
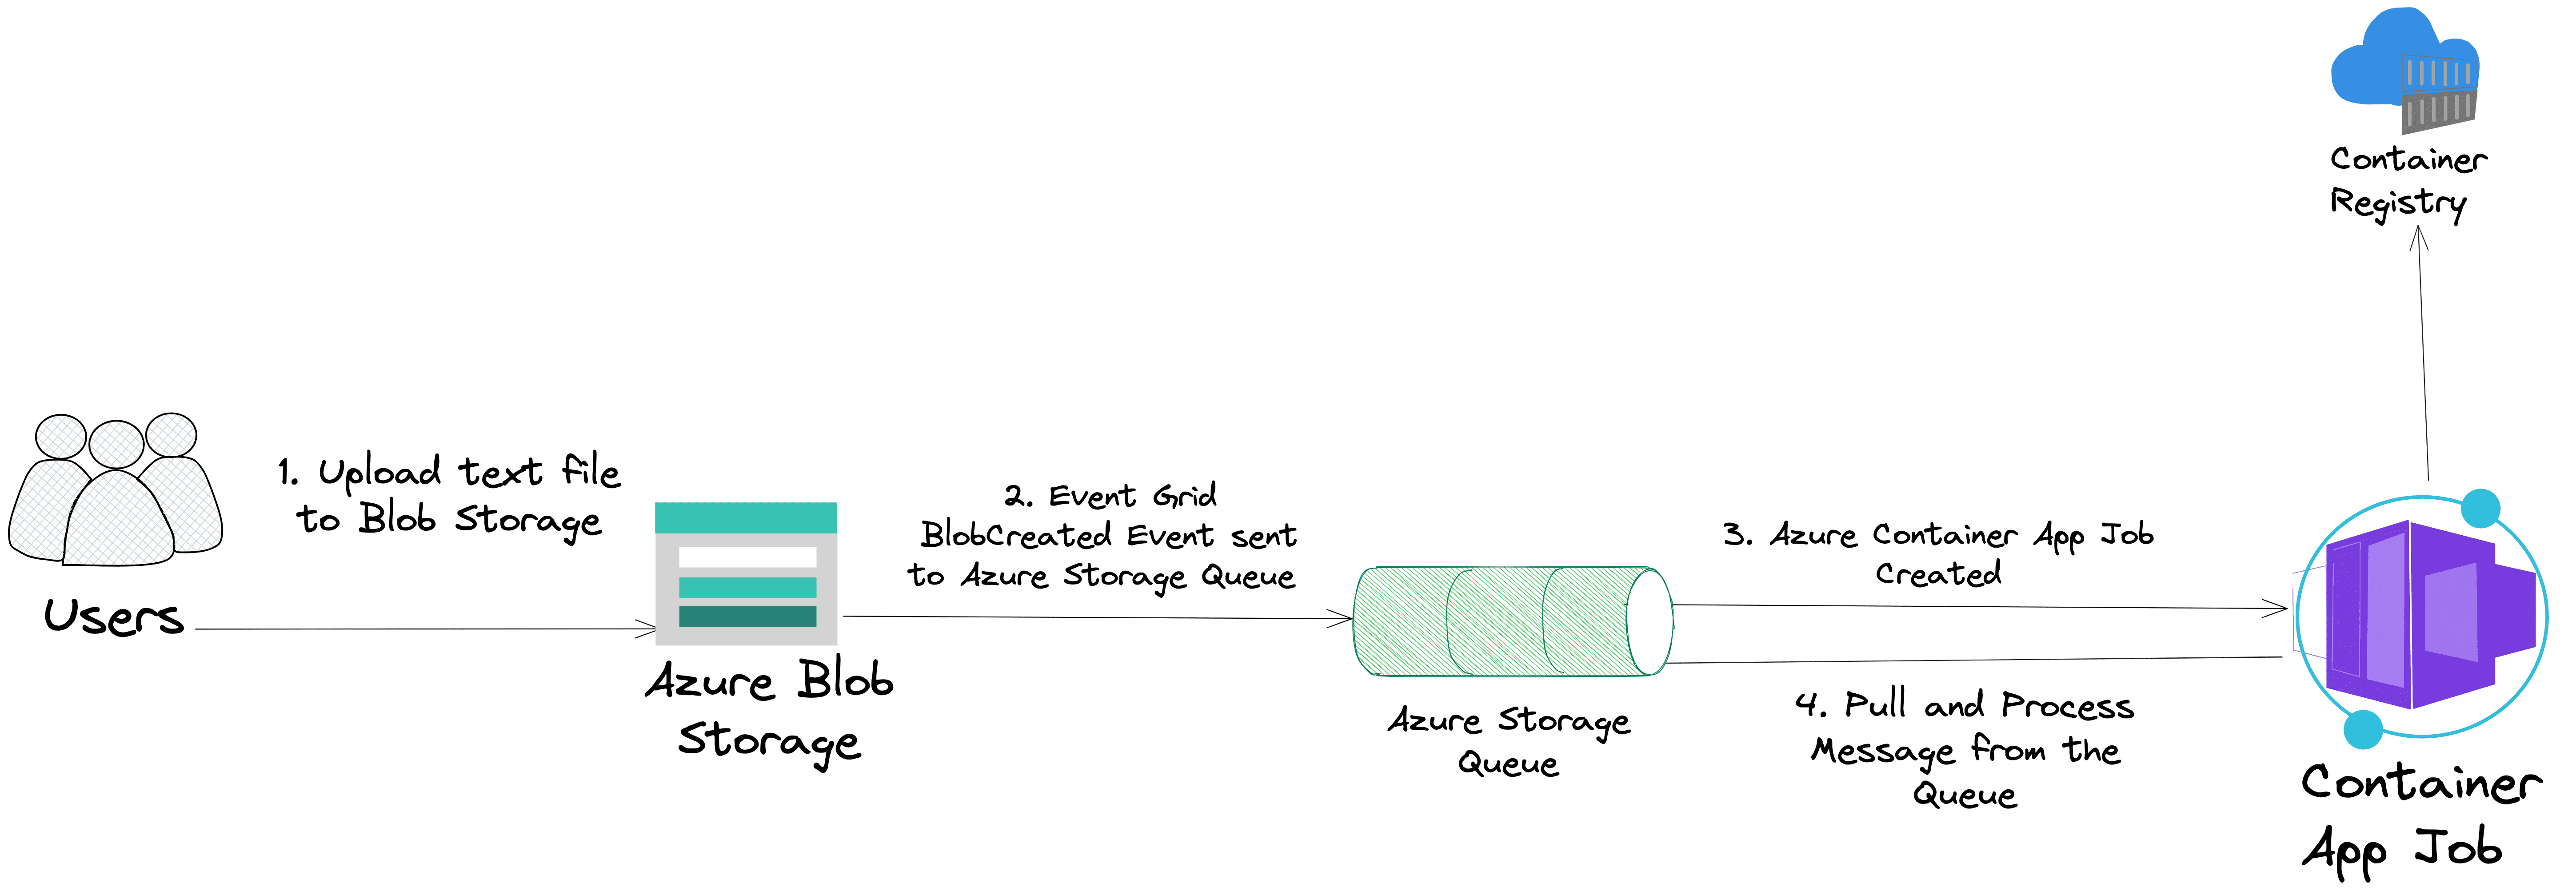
The container app job is packaged as a Docker container and pushed to Azure Container Registry. The container app job is responsible for processing the file. The container app job is triggered by an event published to Azure Event Grid. The event is published when a file is uploaded to Azure Blob Storage. The container app job will pull the event from the Azure Storage Queue and process the file.
Implementation
The pattern for this sample demonstrates how to use Azure Blob Storage with Azure Event Grid subscriptions. Azure Event Grid is an eventing service for the cloud. We’ll demonstrate how an event is published to Azure Storage Queue once we upload a file to Azure Blob Storage. The event will be pulled and processed by an Azure Container App Job.
See the Blob storage events schema article to view the full list of the events that Blob storage supports.
Build & Deploy
To build and deploy the project to your own Azure subscription, you will need to first install the following.
A Dev Container is also provided to make it easy to run the code locally. Instructions on how to use the Dev Container can be found at the root of the GitHub repository nickdala/azure-experiments.
Once you have your development environment set up, building and deploying the solution is accomplished by running the following commands.
Setup Your Development Environment
-
Clone the GitHub repository
git clone https://github.com/nickdala/azure-experiments.git -
Change directory
cd azure-experiments/samples/blob-event-grid-container-app -
Login to Azure using the Azure CLI.
az loginOptional: Set the default subscription. If you have multiple subscriptions, you can list them using
az account list.az account list --output table az account set --subscription <subscription-id> -
Install the latest version of the Azure Container Apps CLI extension.
az extension add --name containerapp --upgrade -
Register the Microsoft.EventGrid, Microsoft.App and Microsoft.OperationalInsights namespaces.
az provider list --query "[?namespace == 'Microsoft.EventGrid']" -o tableYou should see something like the following.
Namespace            RegistrationState    RegistrationPolicy
-------------------  -------------------  --------------------
Microsoft.EventGrid  Registered           RegistrationRequired
If the RegistrationState is not Registered, then run the following to register the provider.
az provider register --namespace Microsoft.EventGrid az provider register --namespace Microsoft.App az provider register --namespace Microsoft.OperationalInsights -
Set environment variables
Source the
env.shfile in the scripts directory. You can edit theenv.shfile to change the default values. Note: Some Azure resources must have globally unique names.source ./scripts/env.sh
Create Azure resources
-
Create a resource group.
az group create \ --name "$RESOURCE_GROUP" \ --location "$REGION" \ --tags system="$TAG" -
Create a storage account.
az storage account create \
  --name "$STORAGE_ACCOUNT_NAME" \
  --resource-group "$RESOURCE_GROUP" \
  --location "$REGION" \
  --tags system="$TAG"
Before we can create the storage container and the storage queue, we need the storage account connection string.
-
Get the storage account connection string.
STORAGE_CONNECTION_STRING=`az storage account show-connection-string --resource-group $RESOURCE_GROUP --name $STORAGE_ACCOUNT_NAME --query connectionString --output tsv` -
Create the text storage container.
az storage container create --name $STORAGE_CONTAINER_NAME_TEXT --account-name $STORAGE_ACCOUNT_NAME --connection-string $STORAGE_CONNECTION_STRING -
Create the storage queue.
az storage queue create --name $QUEUE_NAME --connection-string $STORAGE_CONNECTION_STRING -
Create the event subscription.
First we need the storage account id and the queue endpoint.
STORAGE_ACCOUNT_ID="/subscriptions/$SUBSCRIPTION_ID/resourceGroups/$RESOURCE_GROUP/providers/Microsoft.Storage/storageAccounts/$STORAGE_ACCOUNT_NAME"

QUEUE_ENDPOINT="/subscriptions/$SUBSCRIPTION_ID/resourceGroups/$RESOURCE_GROUP/providers/Microsoft.Storage/storageAccounts/$STORAGE_ACCOUNT_NAME/queueservices/default/queues/$QUEUE_NAME"
Now we can create the event subscription.
az eventgrid event-subscription create \
--name $EVENT_SUBSCRIPTION_NAME \
--source-resource-id $STORAGE_ACCOUNT_ID \
--endpoint-type storagequeue \
--endpoint $QUEUE_ENDPOINT \
--included-event-types Microsoft.Storage.BlobCreated \
--subject-ends-with .txt
Upload Sample Data to Azure Blob Storage
-
First we need the storage account key.
STORAGE_ACCOUNT_KEY=`az storage account keys list --resource-group $RESOURCE_GROUP --account-name $STORAGE_ACCOUNT_NAME --query "[0].value" --output tsv`Verify the storage account key.
echo $STORAGE_ACCOUNT_KEY -
Upload the sample text file.
az storage blob upload \
  --account-name "$STORAGE_ACCOUNT_NAME" \
  --account-key "$STORAGE_ACCOUNT_KEY" \
  --container-name "$STORAGE_CONTAINER_NAME_TEXT" \
  --file "data/sample.txt" \
  --name "sample.txt"
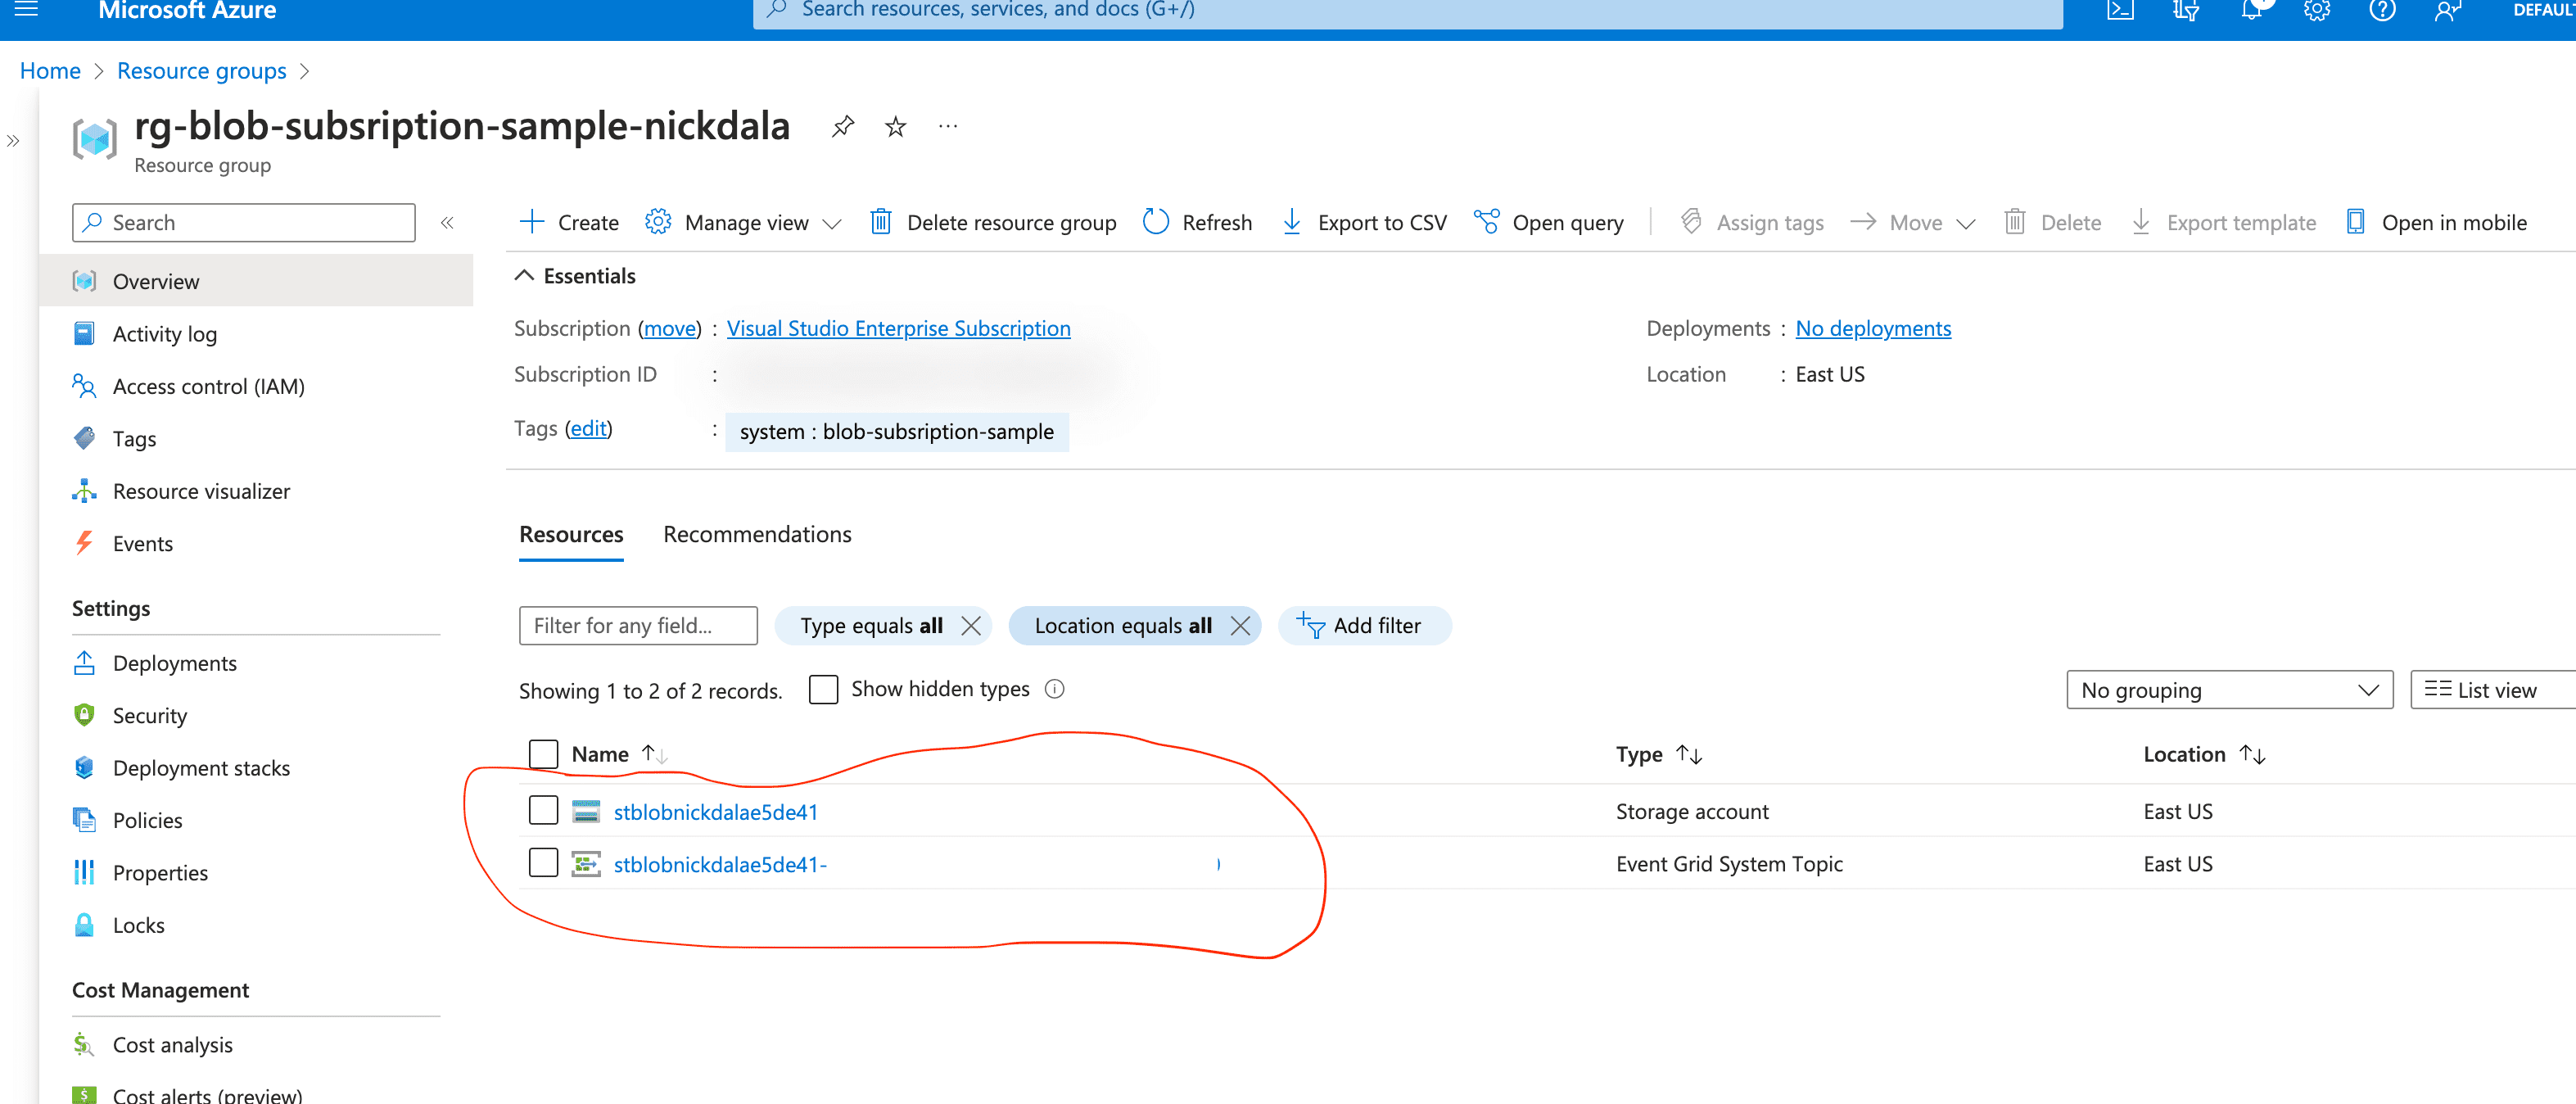
Azure Portal
In the Azure Portal, you will see the storage account, the storage container, the storage queue, and the event subscription.
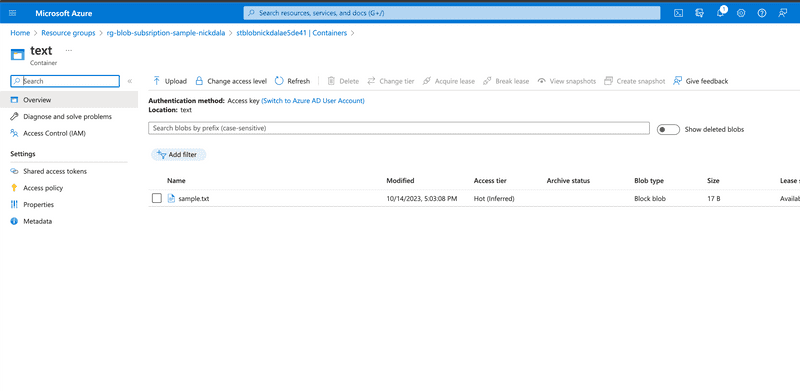
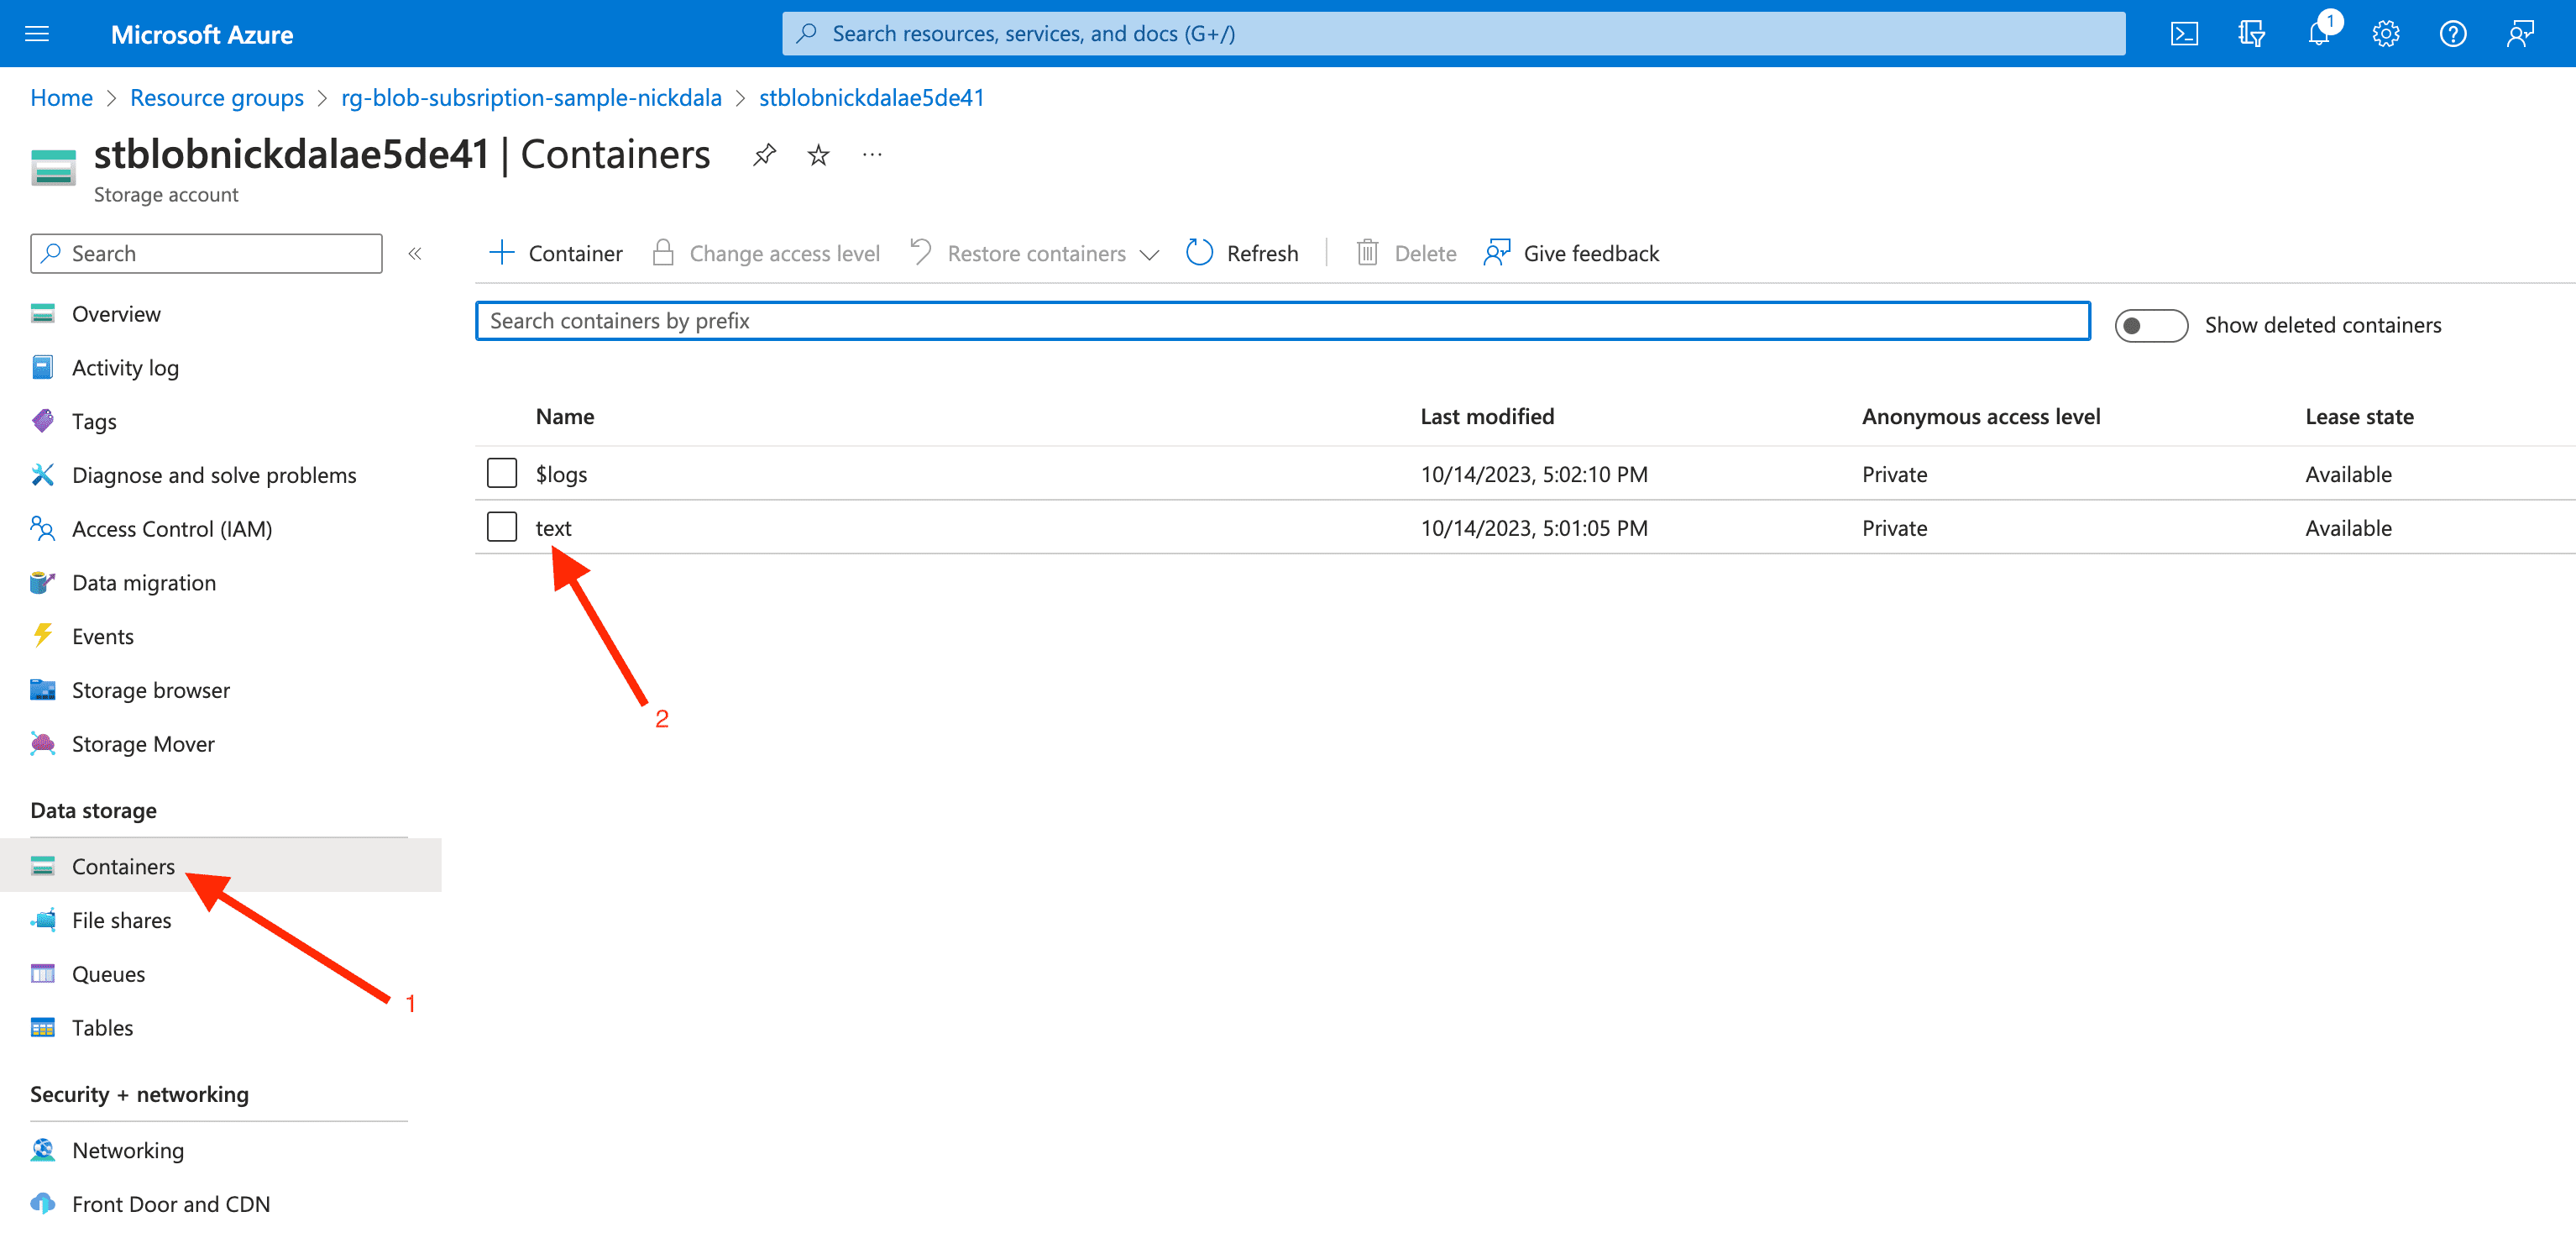
Let’s take a look at the storage container. You should see the sample.txt file we uploaded. Follow the following steps to view the file.
- Click on the storage account.
- Click on the storage container.

- You should see the sample.txt file.

The event subscription published an event to the storage queue after the file was uploaded. Let’s take a look at the storage queue.
- Navigate to the storage account.
- Click on the storage queue.
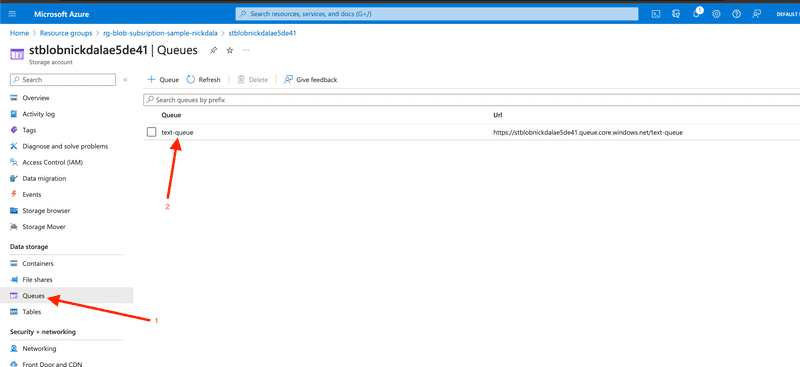
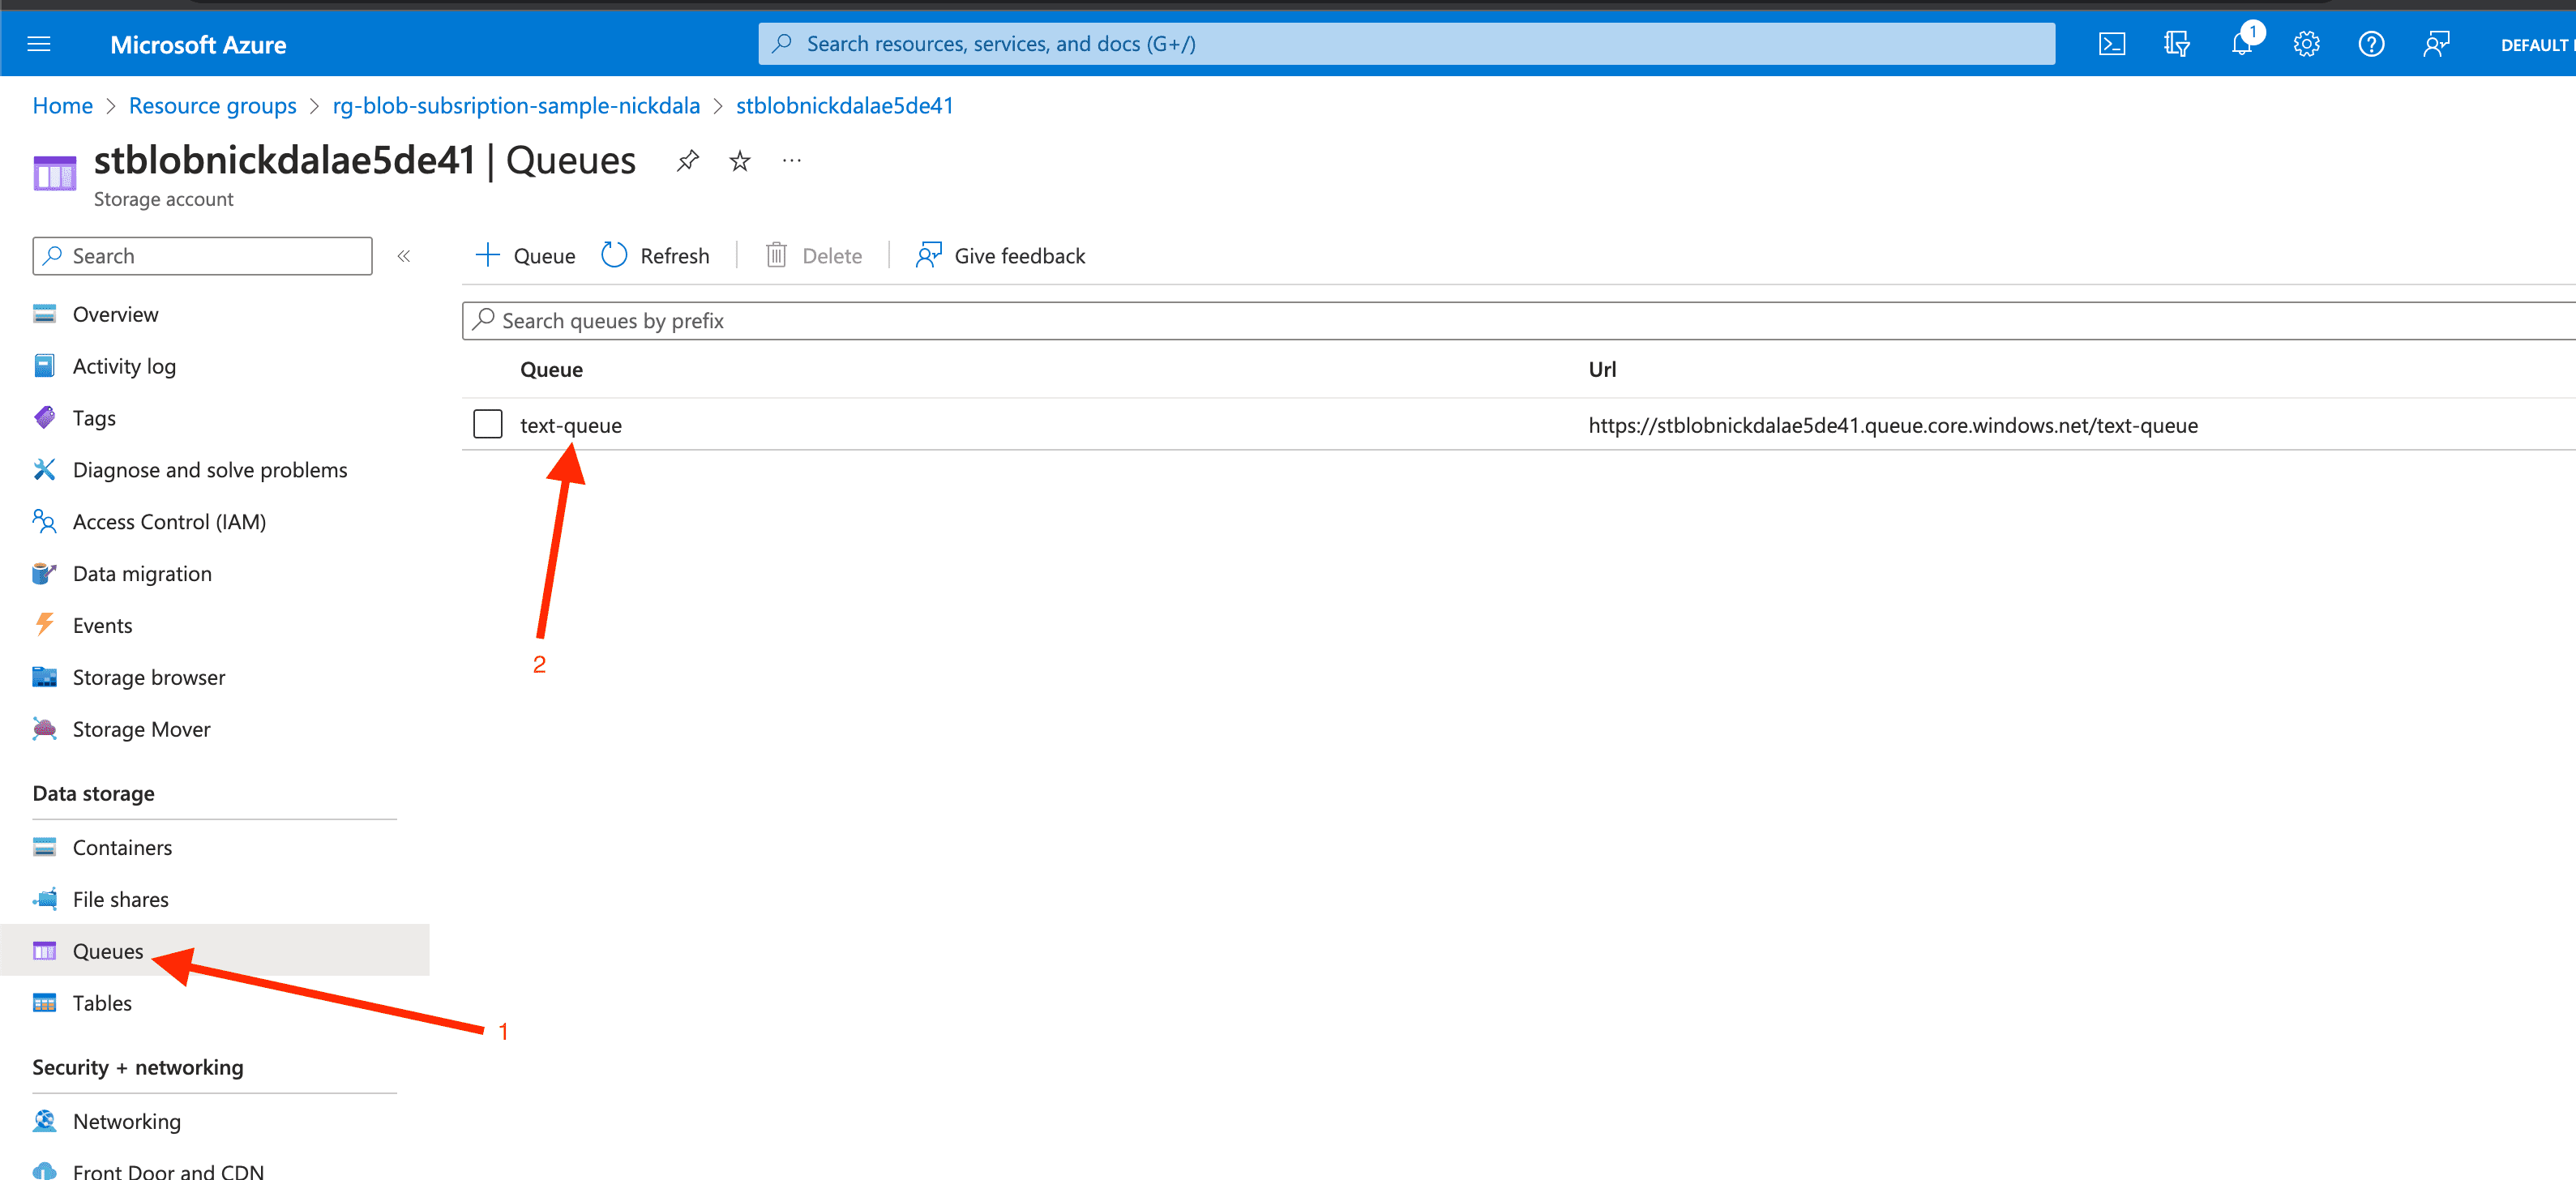
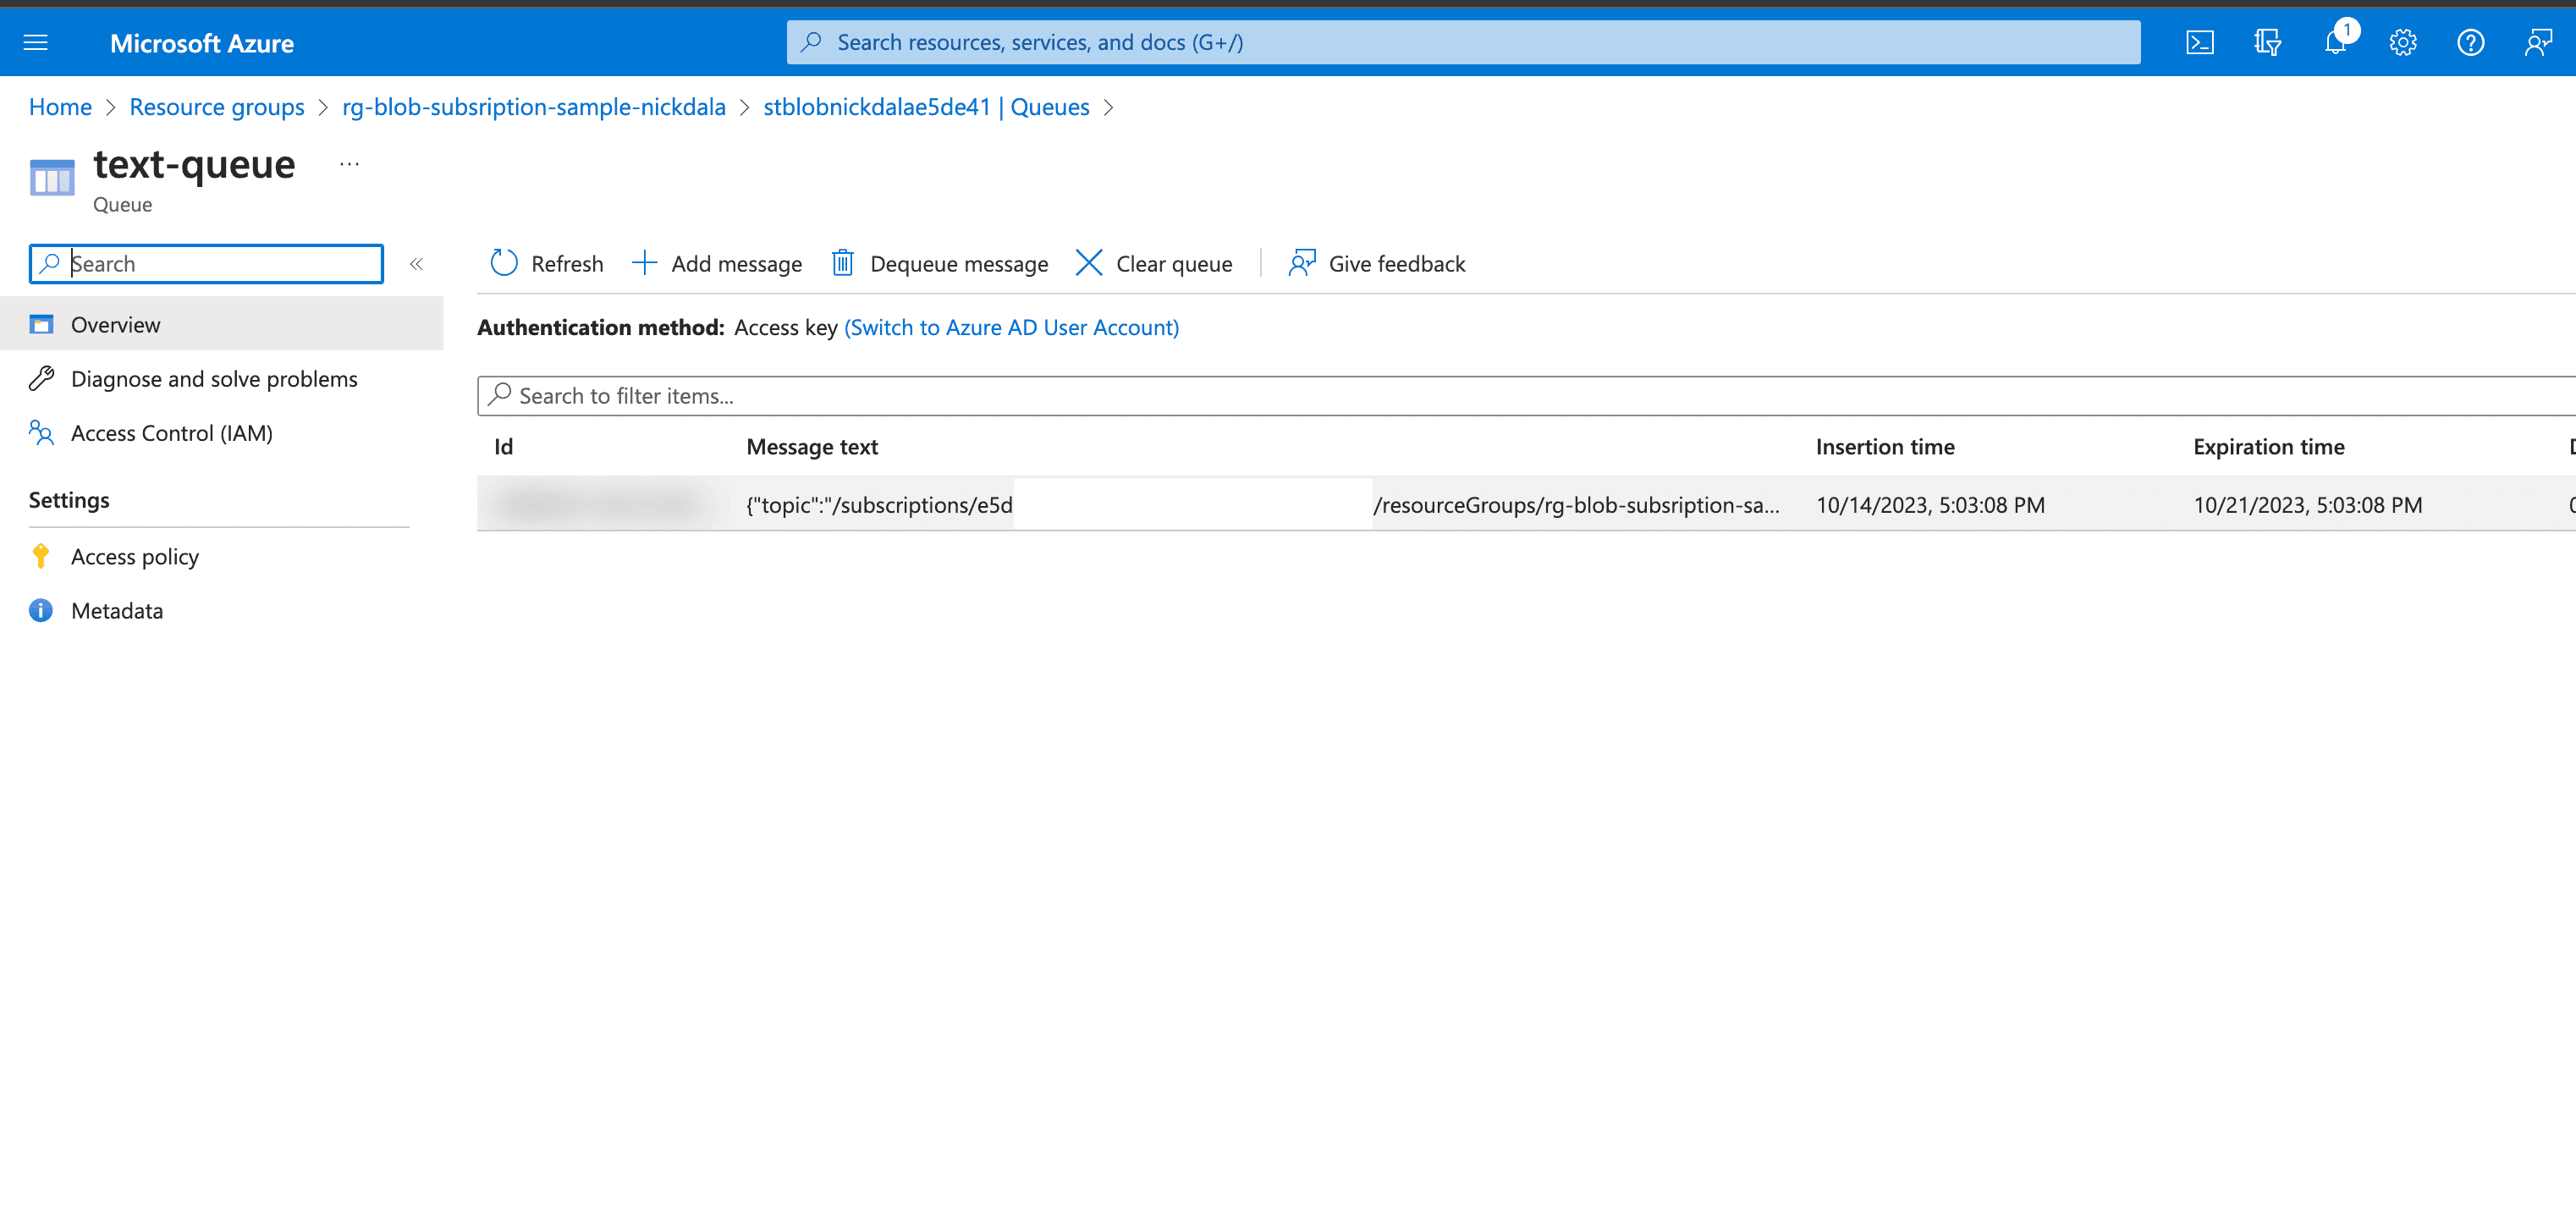
Notice that there is a message in the queue. The message is of the type BlobCreated.
Azure Container Apps
Next, we will build the app to process the message. This app will be deployed as an Azure Container App Job. The source code for the app can be found here. The app will pull the message from the storage queue and log the event id and blob url. Below is the code that pulls the message from the queue.
//Dequeue message from the storage queue.
resp, err := queueClient.DequeueMessage(context.TODO(), &azqueue.DequeueMessageOptions{VisibilityTimeout: to.Ptr(int32(30))})-
Create the Azure Container Registry
az acr create \ --name "$CONTAINER_REGISTRY_NAME" \ --resource-group "$RESOURCE_GROUP" \ --location "$REGION" \ --sku Basic \ --admin-enabled true \ --tags system="$TAG" -
Login to the Azure Container Registry.
az acr login --name "$CONTAINER_REGISTRY_NAME" -
Build the Docker image.
az acr build \ --registry "$CONTAINER_REGISTRY_NAME" \ --image "$CONTAINER_IMAGE_NAME" \ --file Dockerfile . -
Verify the Docker image was pushed to the Azure Container Registry.
az acr repository list --name $CONTAINER_REGISTRY_NAME --output table -
Create the App Environment.
az containerapp env create \ --name "$ACA_ENVIRONMENT" \ --resource-group "$RESOURCE_GROUP" \ --location "$REGION" \ --tags system="$TAG" -
Create the Azure Container App Job.
az containerapp job create \
--name "$ACA_JOB_NAME" \
--resource-group "$RESOURCE_GROUP" \
--environment "$ACA_ENVIRONMENT" \
--trigger-type "Event" \
--replica-timeout "1800" \
--replica-retry-limit "1" \
--replica-completion-count "1" \
--parallelism "1" \
--min-executions "0" \
--max-executions "10" \
--polling-interval "60" \
--scale-rule-name "queue" \
--scale-rule-type "azure-queue" \
--scale-rule-metadata "accountName=$STORAGE_ACCOUNT_NAME" "queueName=$QUEUE_NAME" "queueLength=1" \
--scale-rule-auth "connection=connection-string-secret" \
--image "$CONTAINER_REGISTRY_NAME.azurecr.io/$CONTAINER_IMAGE_NAME" \
--cpu "0.25" \
--memory "0.5Gi" \
--secrets "connection-string-secret=$STORAGE_CONNECTION_STRING" "storage-key=$STORAGE_ACCOUNT_KEY" \
--registry-server "$CONTAINER_REGISTRY_NAME.azurecr.io" \
--env-vars "AZURE_STORAGE_QUEUE_NAME=$QUEUE_NAME" "AZURE_STORAGE_CONNECTION_STRING=secretref:connection-string-secret" "AZURE_STORAGE_ACCOUNT_NAME=$STORAGE_ACCOUNT_NAME" "AZURE_STORAGE_ACCOUNT_KEY=secretref:storage-key"
Verify the event was processed by the Azure Container App
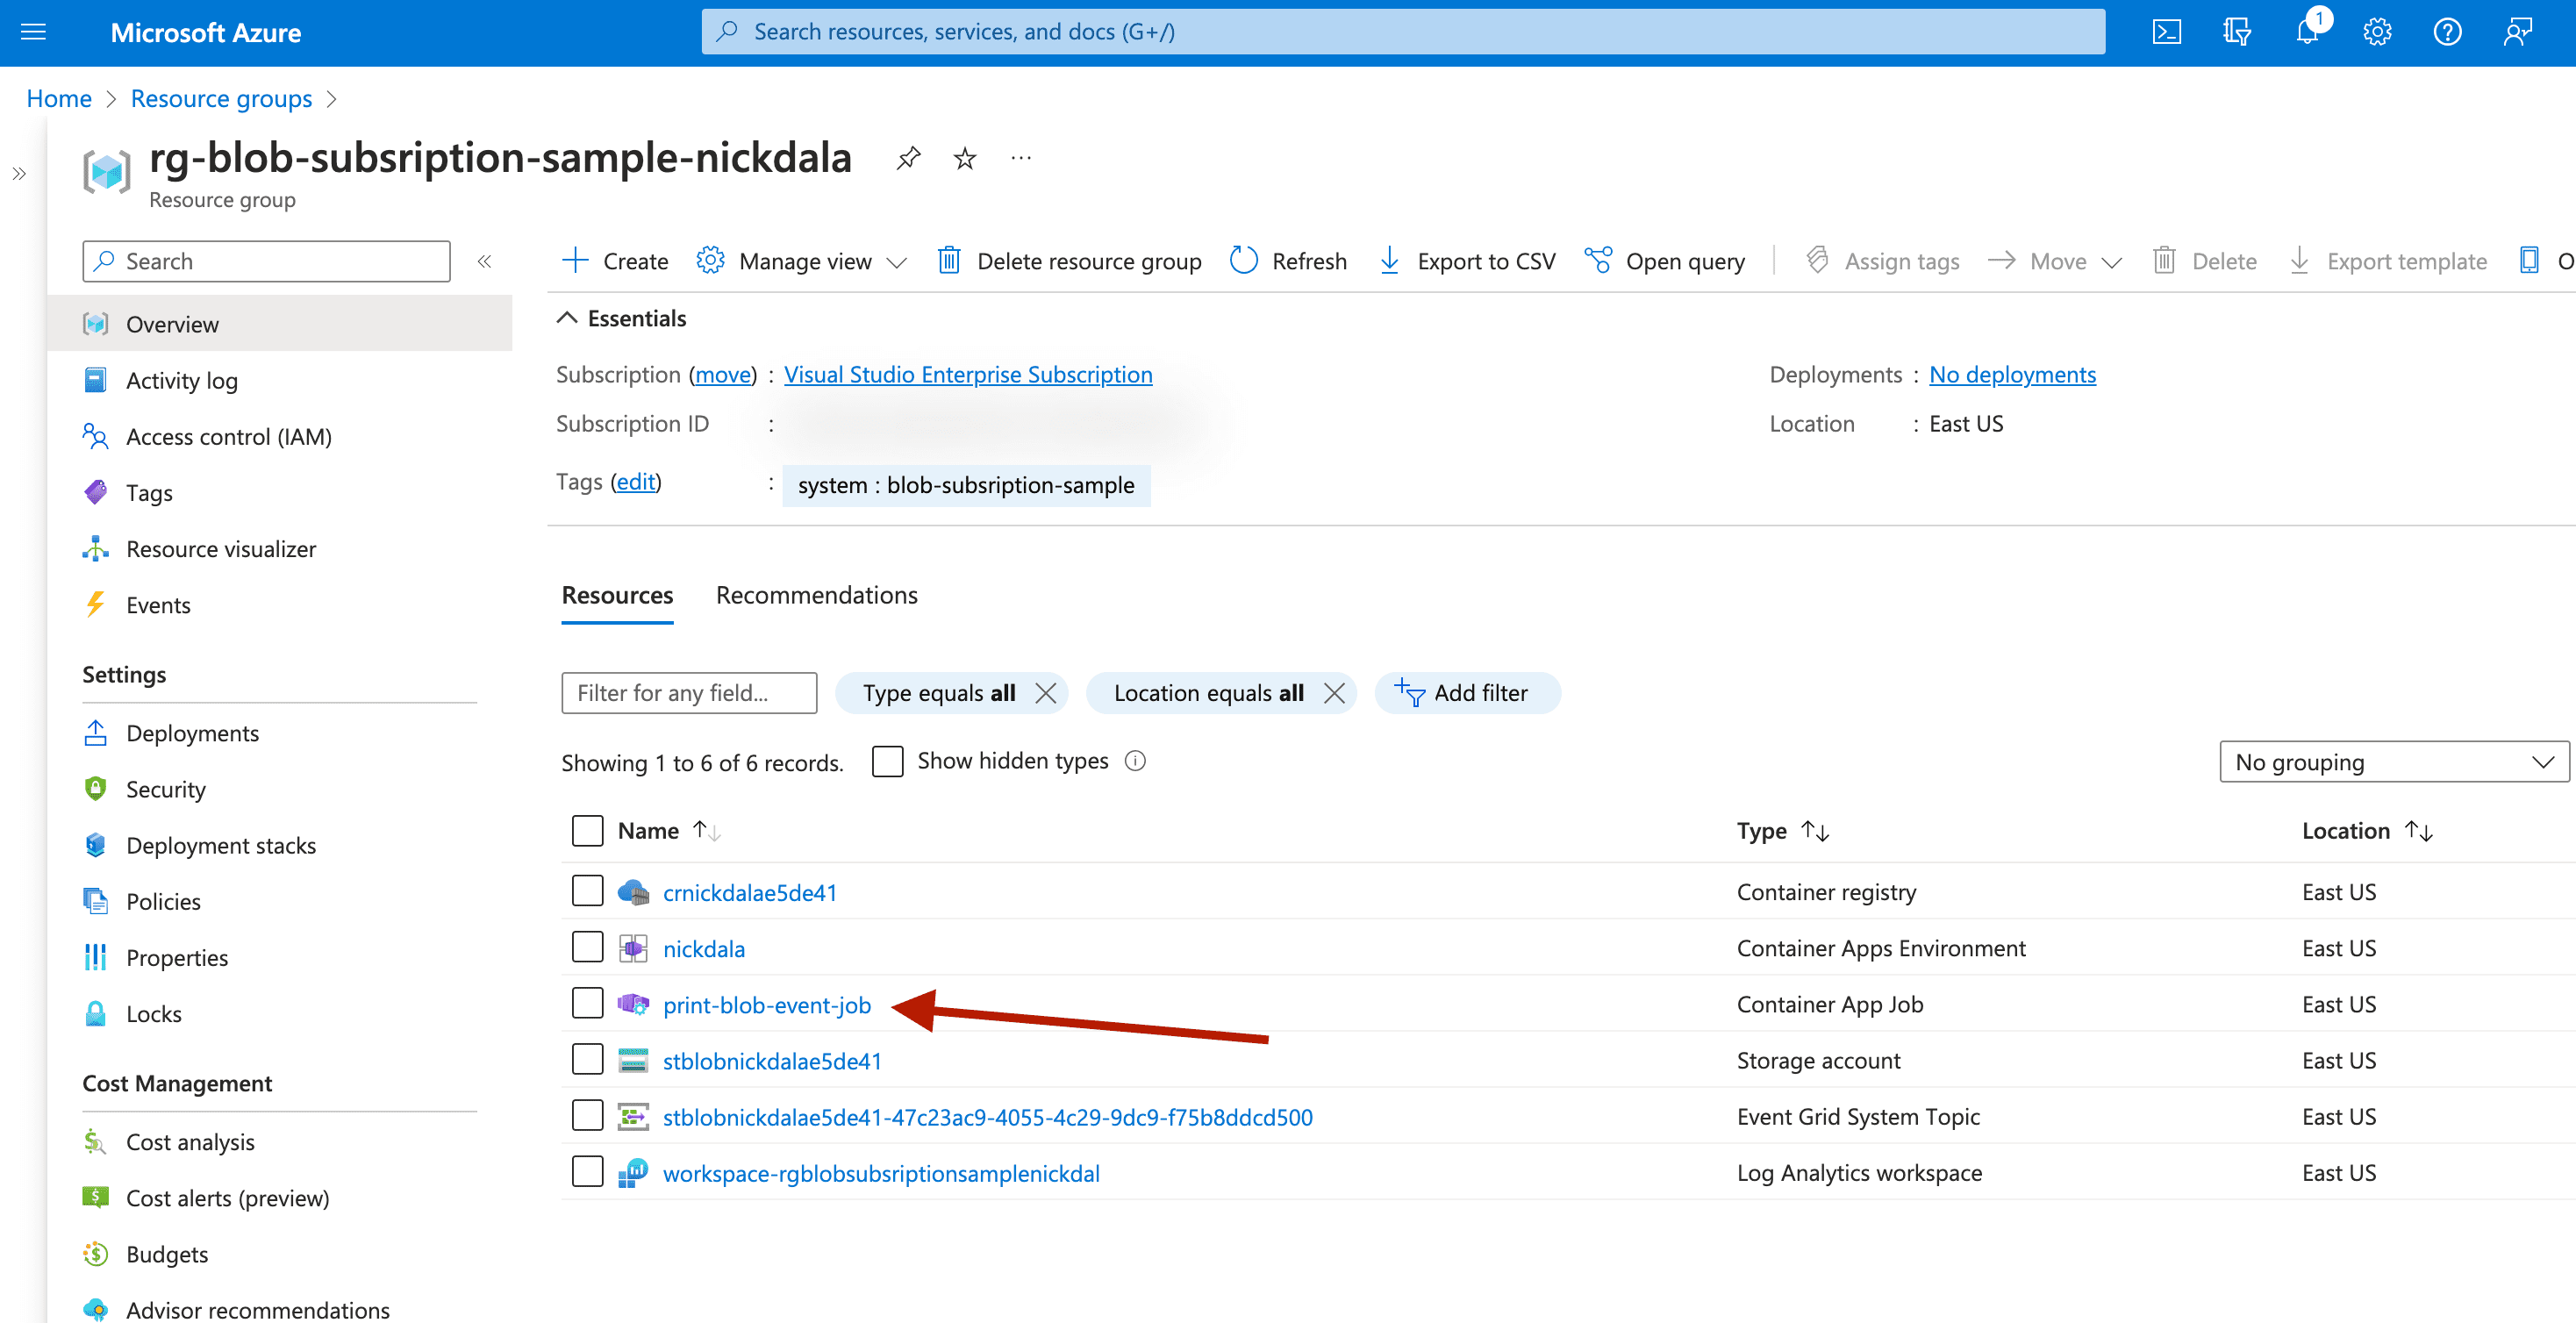
Let’s now take a look at the logs for the Azure Container App Job. The logs will show that the event was processed by the Azure Container App Job. Navigate to the Azure Container App Job in the Azure Portal. Click on the Container App Job.
This will bring you to the Container App Job resource. Here, you can see things like configuration, secrets, and event scaling. We’re going to explore the execution history. Click on the Execution History tab. You should see the following.
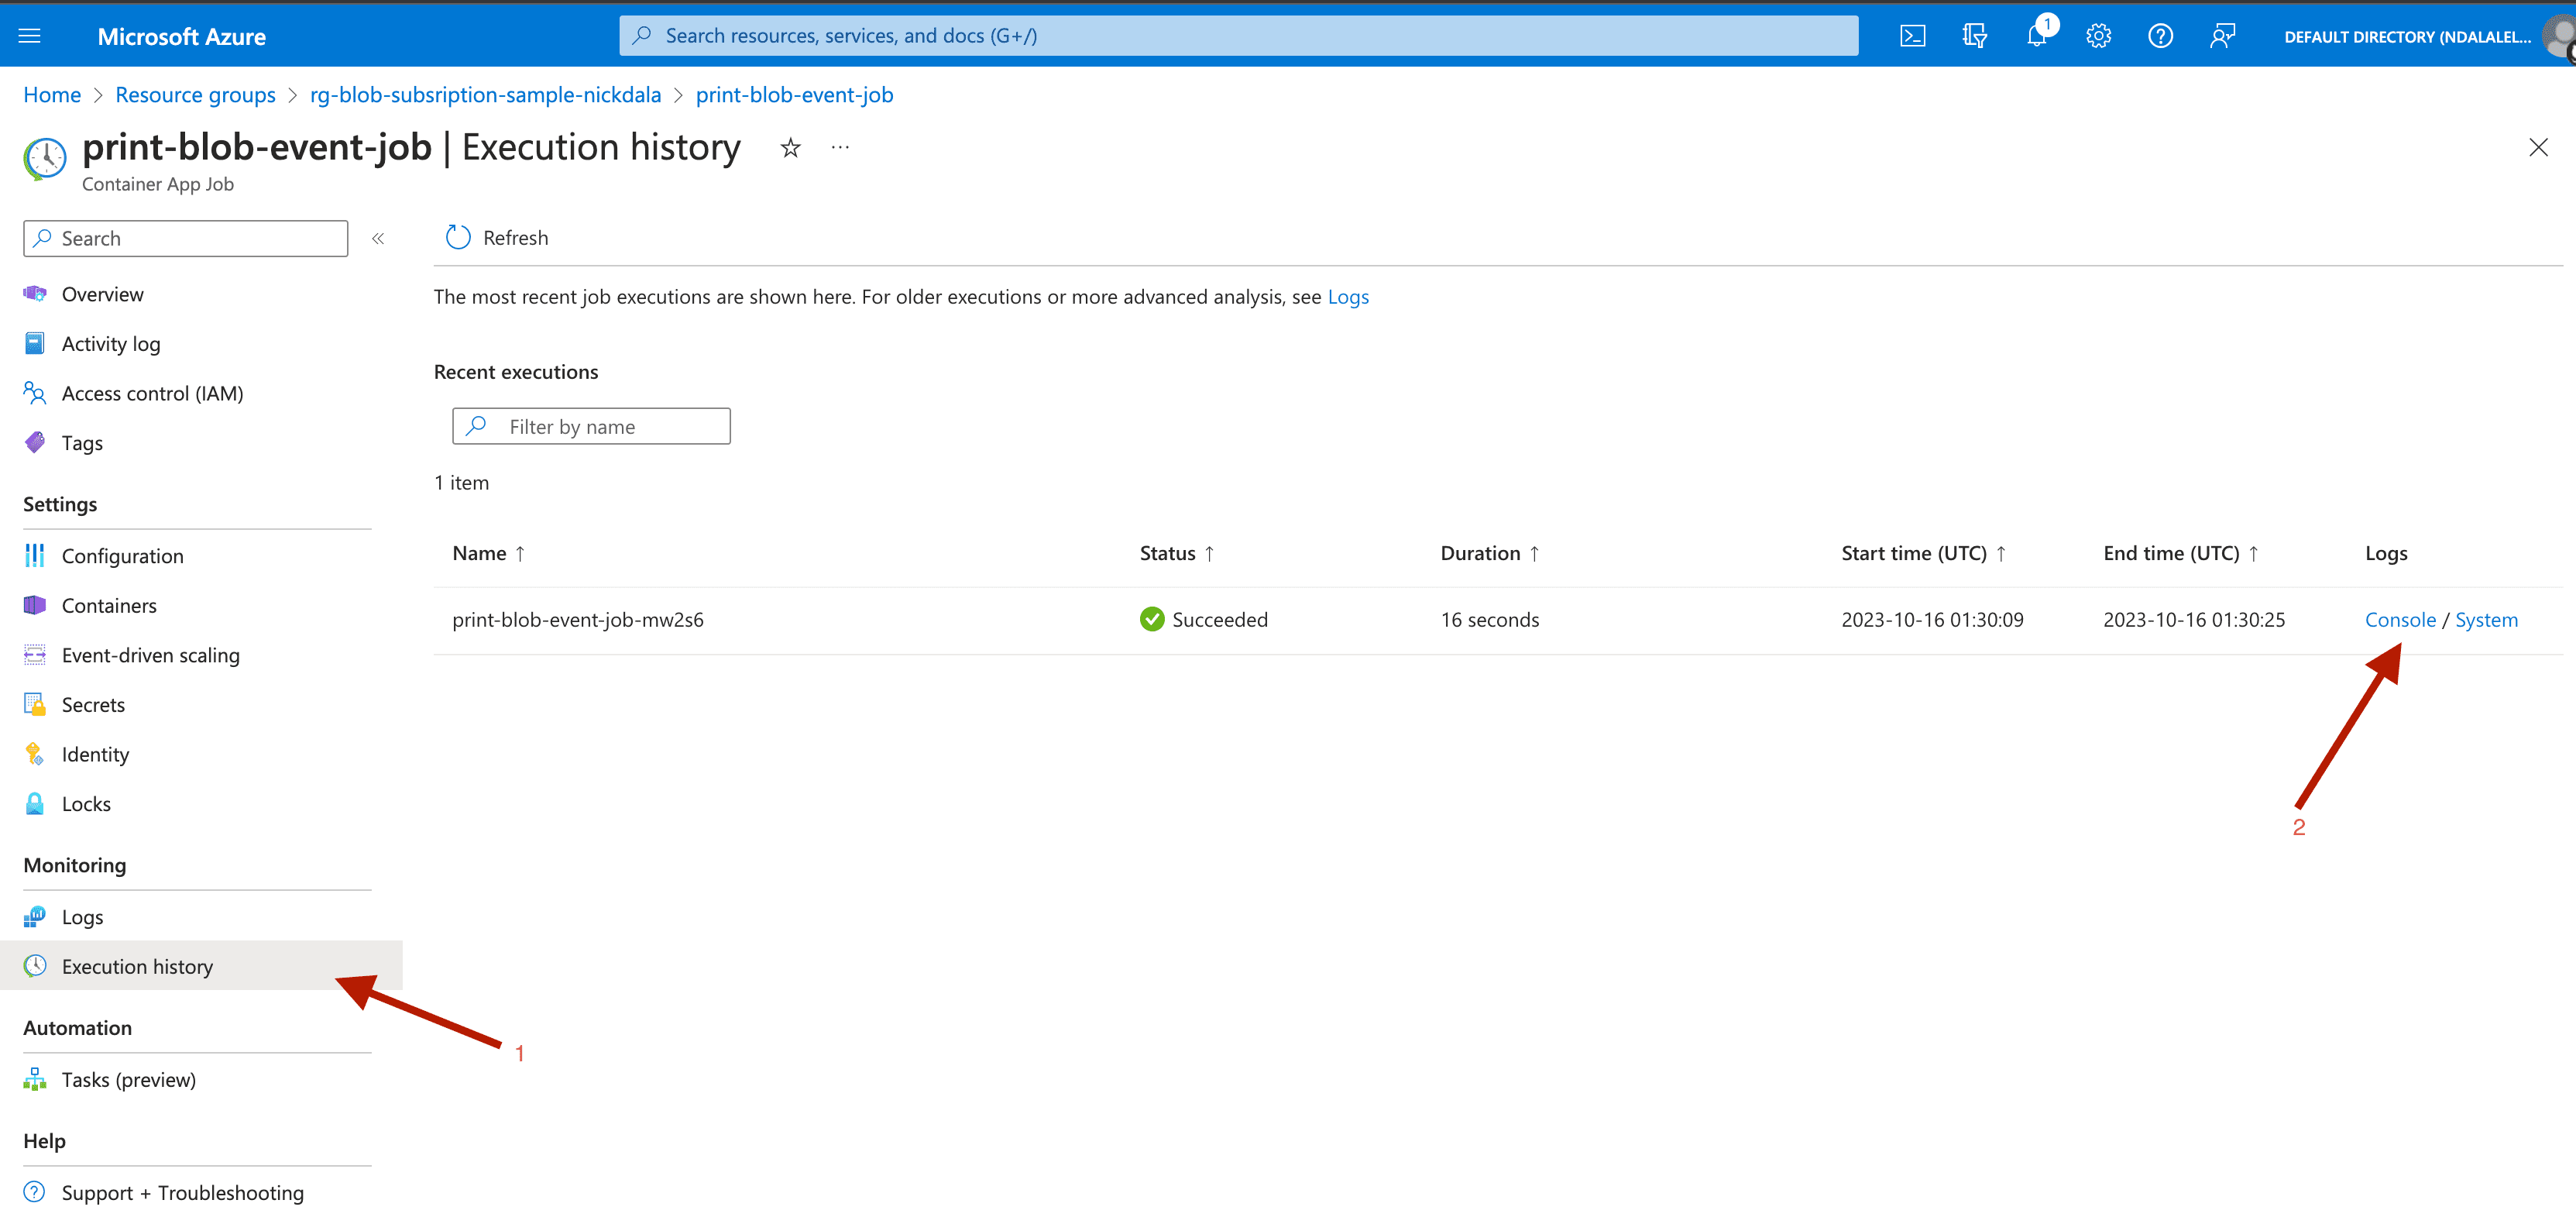
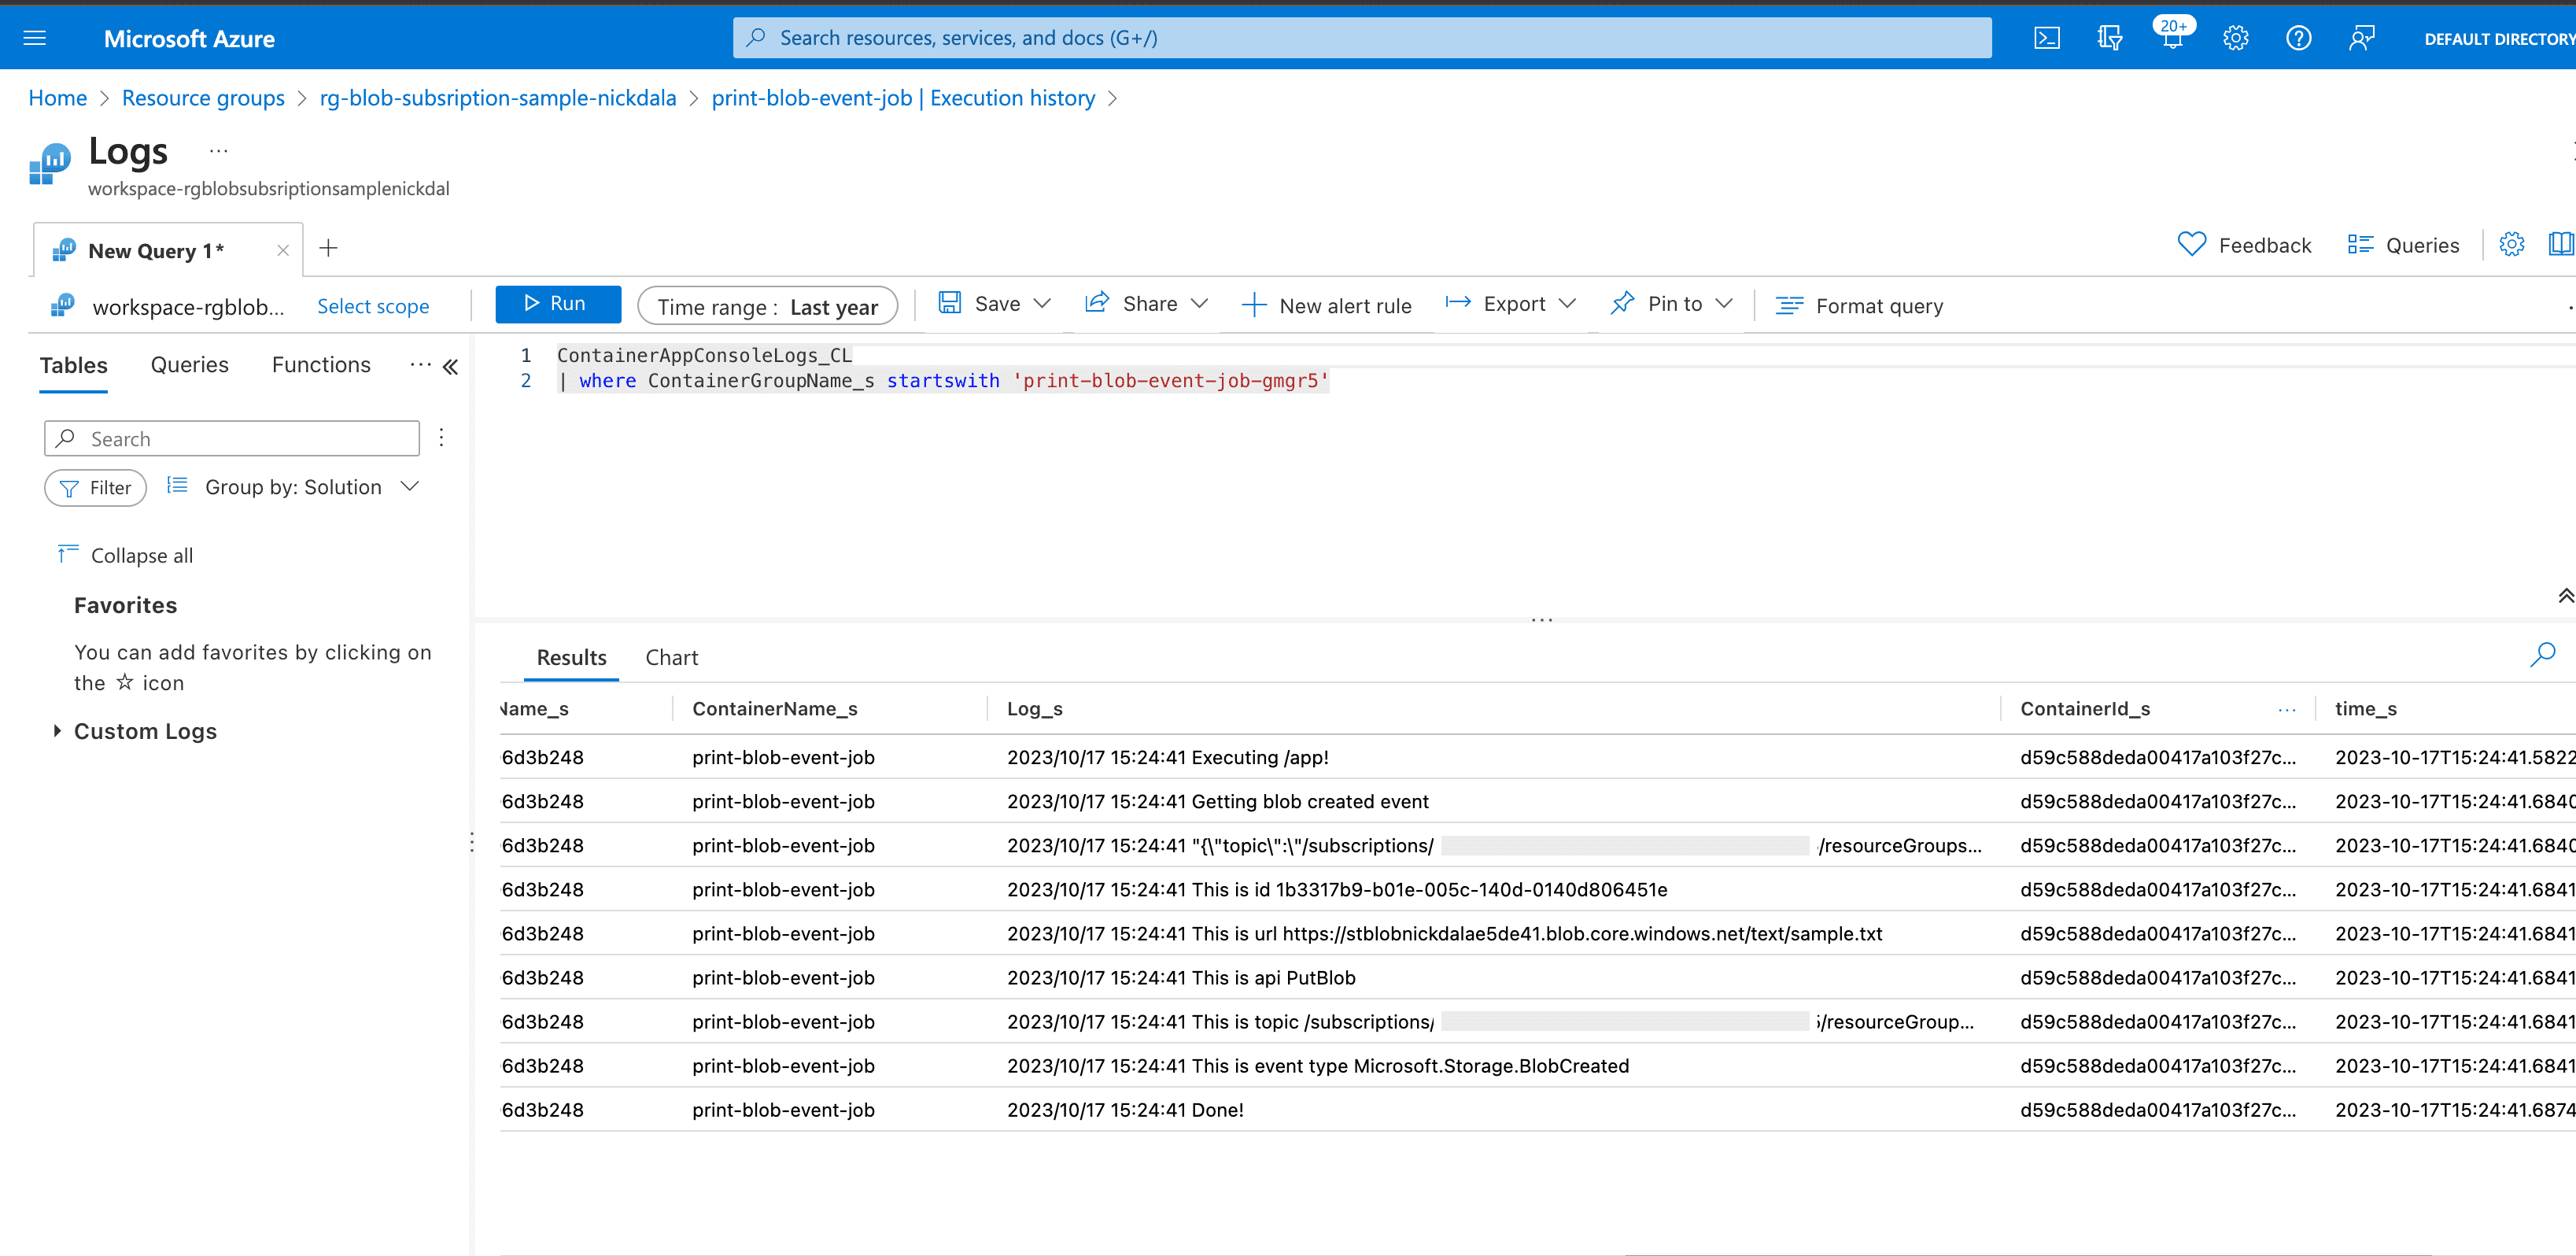
Click on the Console Logs link. You should see the following.
Query job execution logs
You can also query the logs using the Azure CLI. The following steps show you how to query the logs using the Azure CLI.
-
Save the Log Analytics workspace ID for the Container Apps environment to a variable.
LOG_ANALYTICS_WORKSPACE_ID=`az containerapp env show \ --name "$ACA_ENVIRONMENT" \ --resource-group "$RESOURCE_GROUP" \ --query "properties.appLogsConfiguration.logAnalyticsConfiguration.customerId" \ --output tsv` -
Save the name of the most recent job execution to a variable.
JOB_EXECUTION_NAME=`az containerapp job execution list \ --name "$ACA_JOB_NAME" \ --resource-group "$RESOURCE_GROUP" \ --query "[0].name" \ --output tsv` -
Run a query against Log Analytics for the job execution using the following command.
az monitor log-analytics query \
--workspace "$LOG_ANALYTICS_WORKSPACE_ID" \
--analytics-query "ContainerAppConsoleLogs_CL | where ContainerGroupName_s startswith '$JOB_EXECUTION_NAME' | order by _timestamp_d asc" \
--query "[].Log_s"
The following output is an example of the logs printed by the job execution.
[
  "2023/10/17 15:06:41 Getting blob created event",
  "2023/10/17 15:06:41 This is id 0a7343f3-101e-0055-2a0b-01050b06eff5",
  "2023/10/17 15:06:41 This is url https://stblobnickdalae5de41.blob.core.windows.net/text/sample.txt",
  "2023/10/17 15:06:41 This is api PutBlob",
  "2023/10/17 15:06:41 This is event type Microsoft.Storage.BlobCreated",
  "2023/10/17 15:06:41 Done!"
]
Cleanup
az group delete --name $RESOURCE_GROUP --yes --no-waitSummary
Wrapping it all up, we built a serverless, event driven solution to process a file uploaded to Azure Blob Storage using a Container App Job. The solution is able to scale to meet demand. The solution is also able to handle hundreds of file uploads per second. To handle failures, we can set up a dead letter queue. The dead letter queue will store messages that were not processed successfully. This is an enhancement that can be added to the solution.