
Static website - AWS CloudFront, S3, Route 53, and GitHub Actions
In this blog post, I’ll guide you through deploying a static website to AWS using CloudFront, S3, Route 53, and GitHub Actions. Together, we’ll build a scalable, secure, and cost-effective web infrastructure powered by AWS. By automating the deployment process with GitHub Actions, you’ll be able to effortlessly update your website with new content, ensuring a seamless and efficient workflow. Let’s dive in and bring your static website to life on the cloud!
To follow along, you will need:
- An AWS Account
- A GitHub Account
- A domain name registered with Route 53
- AWS CDK installed
- Node.js installed
- AWS CLI installed and configured
What are we going to build
We will build a static website that is hosted on AWS S3 and served through CloudFront. The website that we will deploy is a Nuxt.js application. We’ll also set up a custom domain name using Route 53 and automate the deployment process using GitHub Actions.
When you register a domain with Route 53, a hosted zone gets created for your domain. A hosted zone is a container for DNS records, such as nickthecloudguy.com and subdomains like example.nickthecloudguy.com.

In this blog, we’ll set up a custom domain name using Route 53 for our website at example.nickthecloudguy.com and configure CloudFront as a CDN for our static website. The infrastructure is defined using the AWS CDK. The GitHub repo that defines the infrastructure can be found at nickdala/nickthecloudguy-example-web-infra.
The second part of the blog will focus on the GitHub Actions workflow that automates the deployment process. The workflow builds and deploys our website to AWS and is triggered on every push to the main branch. The GitHub Actions workflow file can be found in the .github/workflows directory in the repo nickdala/nickthecloudguy-example-web.
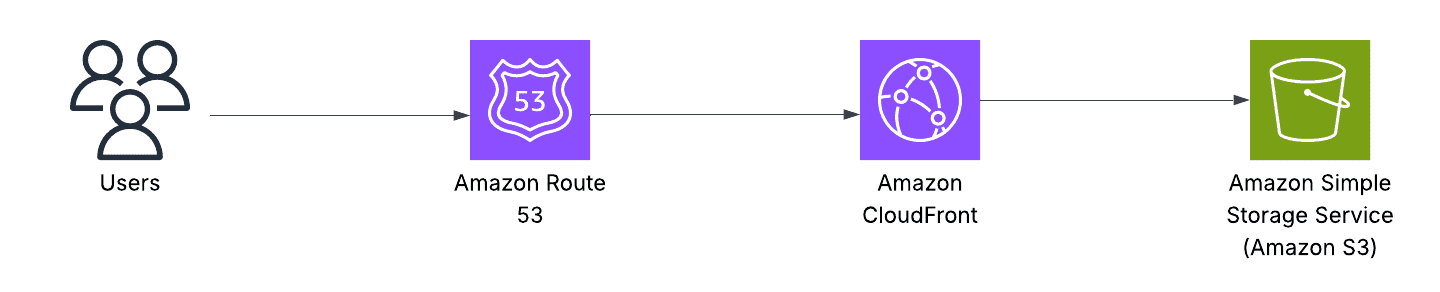
Architecture Overview
The architecture for our static website will look like this:
Project Overview
The goal of the nickdala/nickthecloudguy-example-web-infra project is to create a web infrastructure that is:
- Scalable: Can handle increasing traffic without performance degradation.
- Cost-Effective: Optimized for minimal costs while maintaining high availability.
- Automated: Infrastructure as Code (IaC) ensures repeatability and reduces manual errors.
Key Components
- Web Hosting: The website is hosted using an S3 bucket configured for static website hosting. This ensures high availability and low latency.
- Content Delivery: AWS CloudFront is used to distribute the content globally, reducing latency and improving load times for users.
- SSL/TLS: An SSL certificate is provisioned to enable secure HTTPS access to the website.
- Domain Management: A Route 53 hosted zone is used to manage the domain and DNS records.
- Continuous Deployment: GitHub Actions is integrated for CI/CD, ensuring that every code change is automatically deployed.
Project Structure
Here’s a quick overview of the project structure:
/bin
  - web-site.ts: Entry point for the CDK app.
/lib
  - web-stack.ts: Defines the main infrastructure stack.
  - github-creds.ts: Manages GitHub credentials for CI/CD.
/website
  - index.html: The initial static website content.
Highlights of the Infrastructure
Web Stack
The web-stack.ts file defines the core infrastructure:
- An S3 bucket for hosting the website.
- A CloudFront distribution for global content delivery.
- Route 53 for domain management.
- SSL certificate for secure HTTPS access.
GitHub Integration
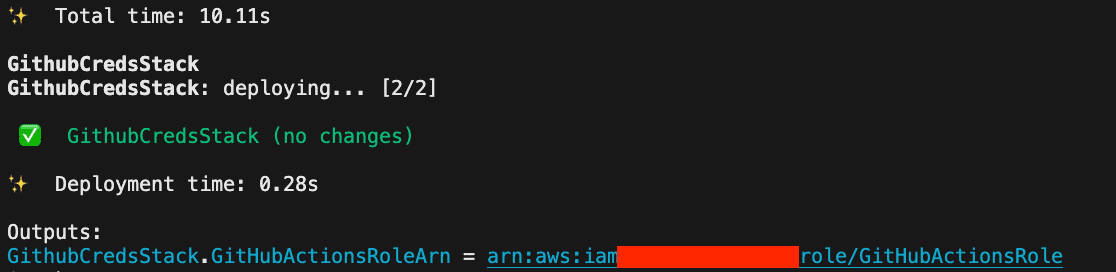
The github-creds.ts file handles GitHub credentials securely, enabling seamless integration with GitHub Actions for CI/CD. After running the cdk deploy command, an IAM role is created for GitHub Actions. Take note of the output from the cdk deploy command, as it contains the ARN for the GitHub role needed for the workflow.
Static Website
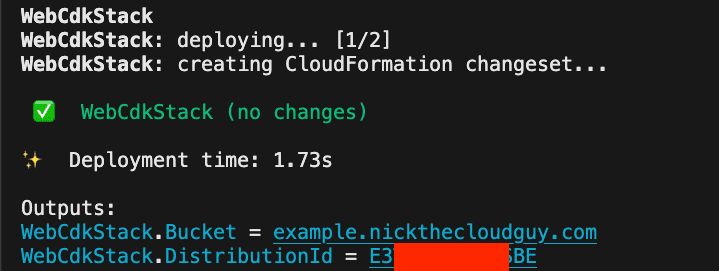
The website folder contains the static HTML content for the website that is deployed to the S3 bucket. A CloudFront distribution is set up to serve the content from the S3 bucket, ensuring low latency and high availability. Take note of the id of the CloudFront distribution id, as it will be used to set up the GitHub Actions workflow.
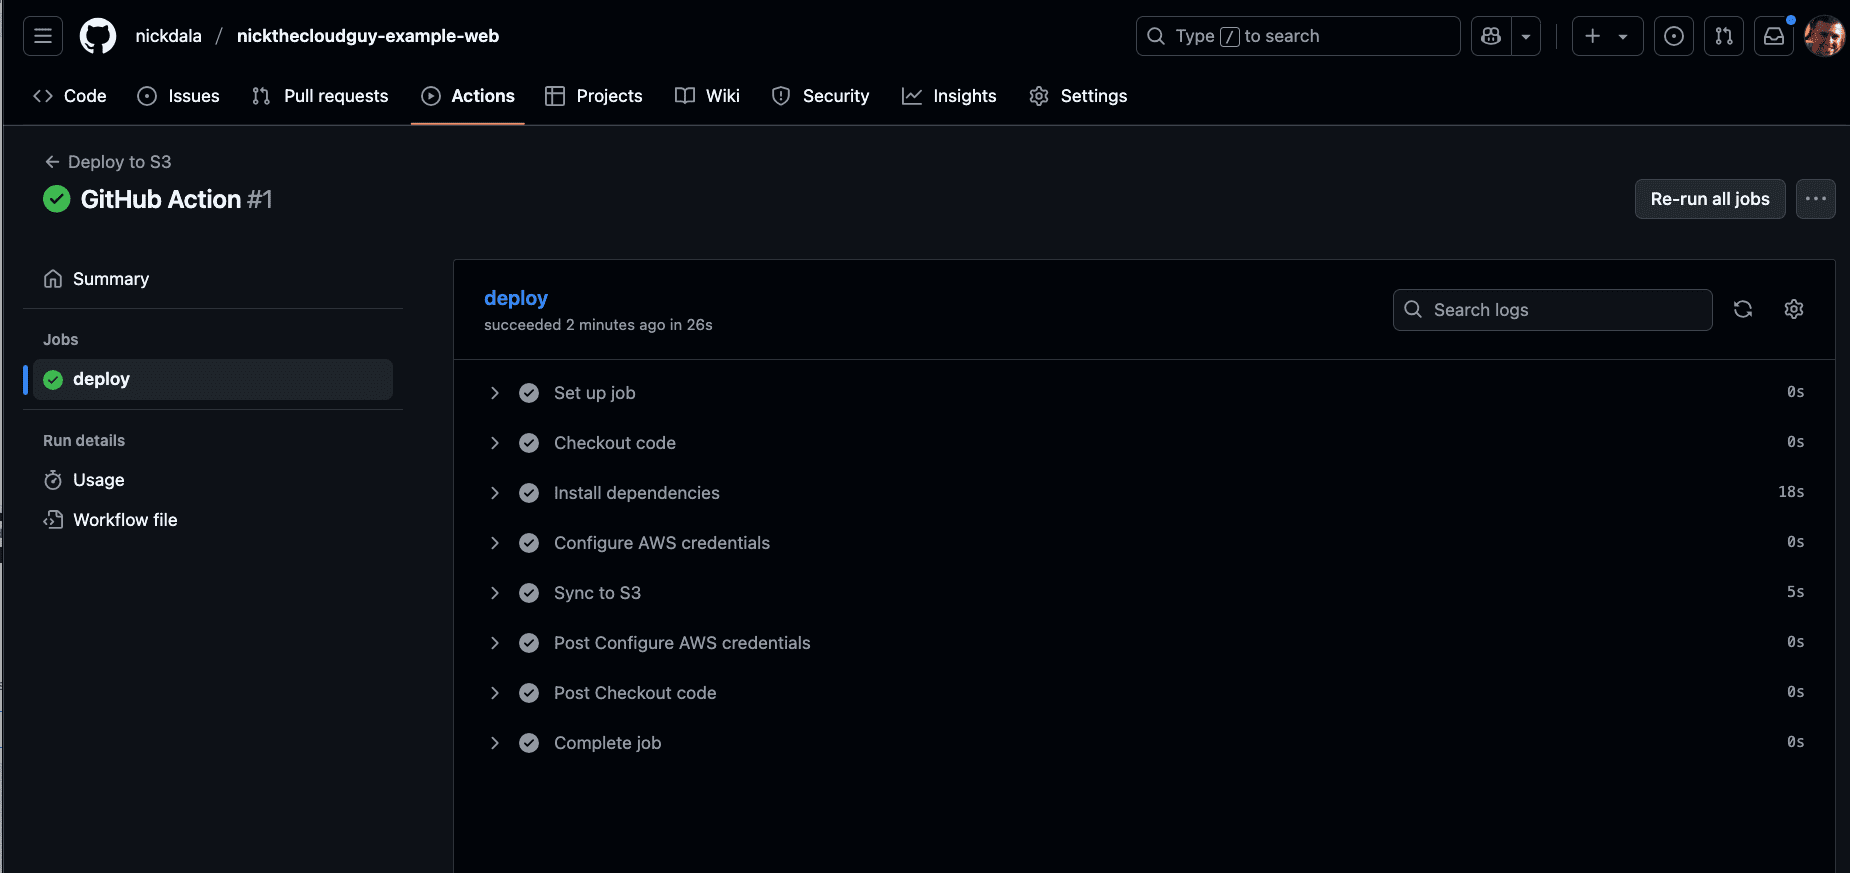
GitHub Actions Workflow
The goal of the nickdala/nickthecloudguy-example-web project is to automate the deployment process of the website using GitHub Actions. This ensures that every code change is automatically built and deployed to AWS.
In order to achieve this, we have set up a GitHub Actions workflow to be triggered on every push to the main branch. This is done with the following:
on:
  push:
    branches:
      - main
To set up the secrets required for the GitHub Actions workflow, follow these steps:
- Go to your GitHub repository settings.
- Navigate to the “Secrets and variables” section.
- Click on “Actions” and then “New repository secret”.
The following secrets need to be added:
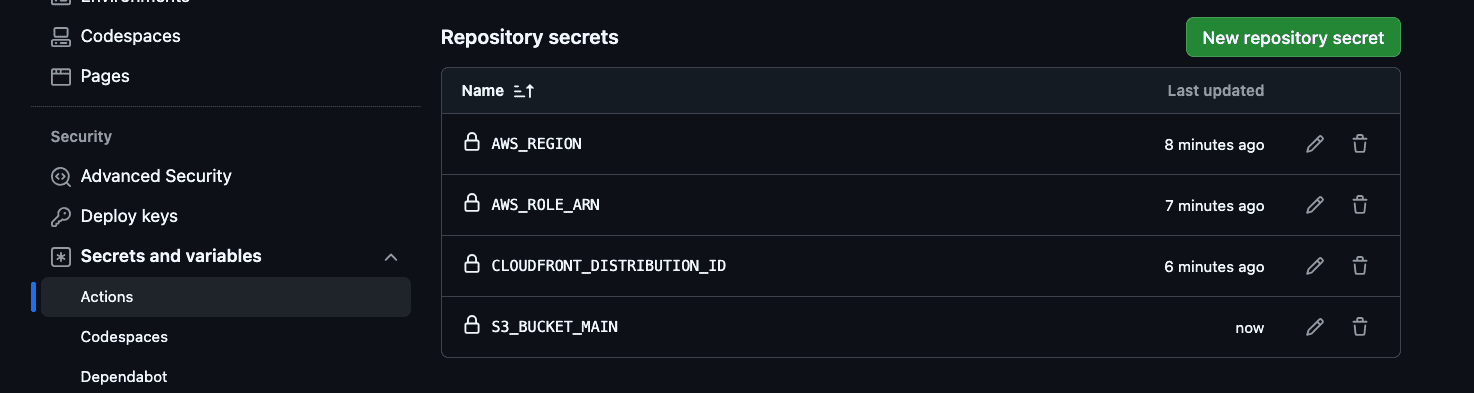
AWS_ROLE_ARN: The ARN of the IAM role created for GitHub Actions. This is the role that will be assumed by GitHub Actions to deploy the website.AWS_REGION: The AWS region where the resources are deployed (e.g.,us-east-1).CLOUDFRONT_DISTRIBUTION_ID: The ID of the CloudFront distribution created in the web-stack.ts file.S3_BUCKET_MAIN: The name of the S3 bucket used for the main website content (e.g.,example.nickthecloudguy.com).
These secrets are used in the GitHub Actions workflow to authenticate with AWS and deploy the website. The code snippet below shows the GitHub Actions workflow that will deploy the site to the S3 bucket and trigger the CloudFront invalidation.
jobs:
  deploy:
    runs-on: ubuntu-latest

    steps:
    - name: Configure AWS credentials
          uses: aws-actions/configure-aws-credentials@v4
          with:
            role-to-assume: ${{ secrets.AWS_ROLE_ARN }}
            role-session-name: GitHub_to_AWS_via_FederatedOIDC
            aws-region: ${{ secrets.AWS_REGION }}

        - name: Sync to S3
          run: |
            BUCKET_NAME=${{ secrets.S3_BUCKET_MAIN }}

            aws s3 sync .output/public s3://$BUCKET_NAME --delete

            # Invalidate the cloudfront distribution
            aws cloudfront create-invalidation --distribution-id ${{ secrets.CLOUDFRONT_DISTRIBUTION_ID }} --paths "/*"
Once the workflow is set up, every push to the main branch will trigger the deployment process.
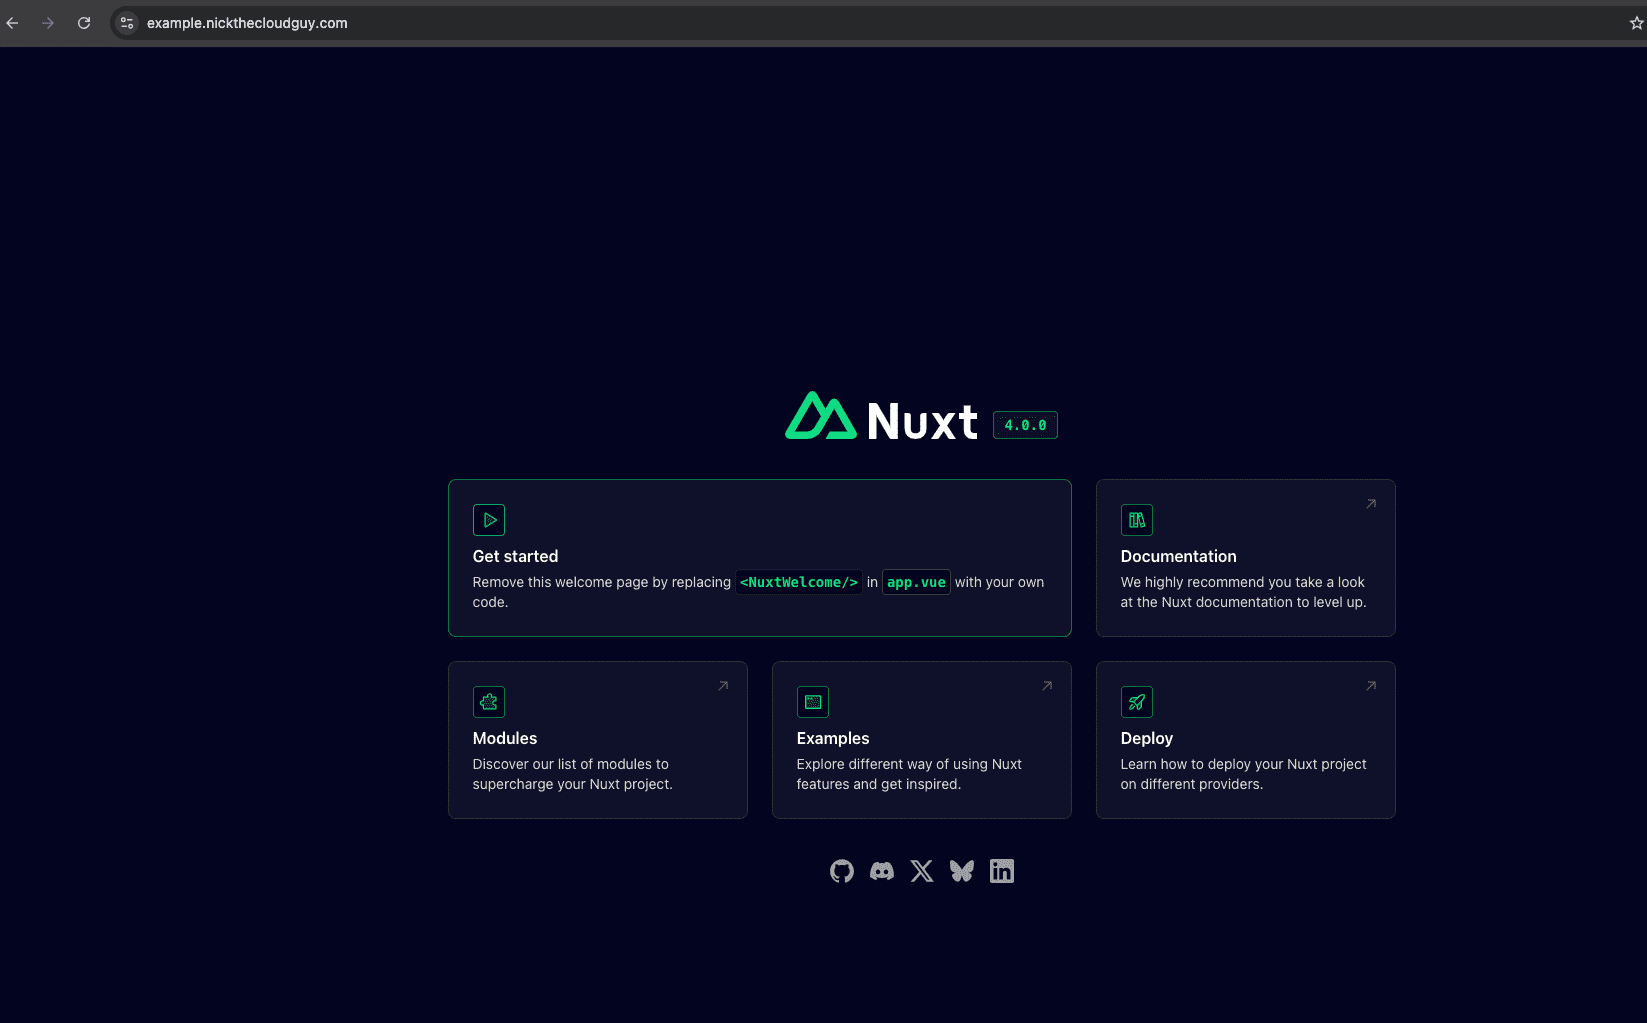
The resulting website can be accessed at https://example.nickthecloudguy.com.
Challenges and Learnings
One of the biggest challenges in deploying a static website on AWS is piecing together the various components like CloudFront, S3, SSL certificates, and Route 53 into a cohesive, end-to-end solution. Configuring these services to work seamlessly, especially automating SSL certificate validation, can be complex and time-consuming. By leveraging the AWS CDK, I was able to define this entire process in code, making it repeatable and significantly simplifying the setup. This approach not only streamlined the deployment for this project but also provided a reusable template that I’ve successfully applied to other websites I’ve built.
Conclusion
This project demonstrates the power of AWS and GitHub Actions in building scalable and reliable web infrastructures. By using IaC defined with the AWS CDK, I was able to automate the deployment process and ensure consistency across environments.
If you’re looking to build a similar project, I highly recommend exploring AWS CDK and GitHub Actions. They are a game-changer for cloud infrastructure development and automated deployments.