Amazon Virtual Private Cloud (Amazon VPC) Fundamentals (Part 2)
In Part 1, we created a VPC with a public and private subnet. In this blog post, we will configure routing and security. Routing is how network packets travel in the VPC. This includes internal traffic between instances inside of the VPC as well as traffic leaving and entering the VPC. Finally, we’ll go over security using Security Groups and Network ACLs.
Route Tables
A VPC has a router whose job is to direct network traffic. The route table contains entries that are rules used to determine how network traffic is directed from your subnet or gateway. A subnet can only be associated with a single route table. But a single route table can be assigned to multiple subnets.
The Public Subnet Route Table
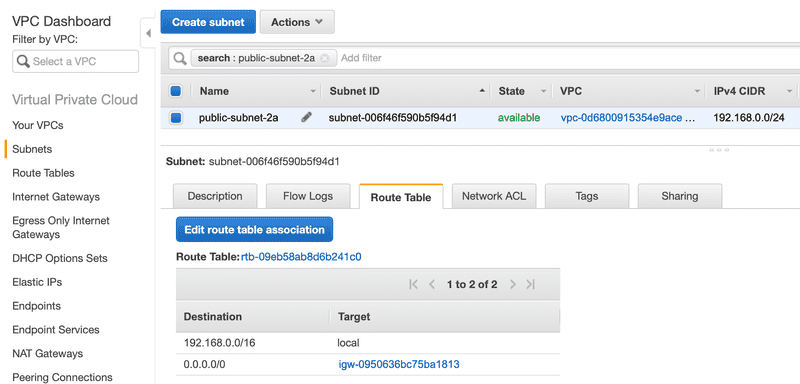
Below is the route table associated with the public subnet that we created in Part 1.
Let’s dissect the entries in the route table. The destination 192.168.0.0/16 should look familiar. This is the network CIDR that we assigned to the VPC. The local target just means that traffic is routed locally in the VPC for 192.168.0.0/16 addresses. This is necessary to allow traffic to flow from an instance in one subnet to another instance in the same or different subnet in our VPC. Now let’s look at the next route entry in the route table. The destination 0.0.0.0/0 is a catch all route whose target is the internet gateway.
So our route table assigned to the public subnet has the following two rules. The first rule is that anything that matches local traffic, i.e. 192.168.0.0/16, is routed within the VPC. The second rule states that anything that doesn’t match the local traffic is routed to the internet gateway. The more specific routes get precedence over the less specific routes.
The Private Subnet Route Table
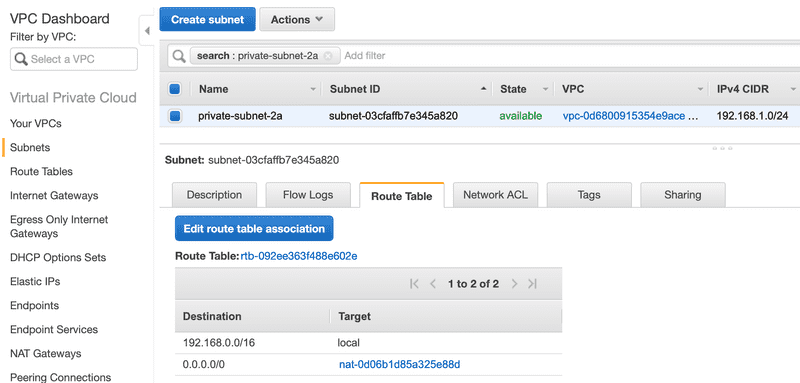
Let’s now see how an instance in the private subnet can get access to the internet. The first thing we need is to spin up spin up a NAT Gateway in the public subnet. We did this in Part 1. The NAT Gateway is responsible for receiving packet from within the VPC and route it to the internet via the internet gateway. Below is the route table for the private subnet.
Just like the public subnet, there is an entry for local traffic. But unlike the public subnet’s route table, the catch all route of 0.0.0.0/0 has the NAT gateway for the target. The NAT Gateway is a way to send traffic out of the VPC to the internet. The NAT gateway allows outbound traffic from the VPC but doesn’t allow requests from the Internet to initiate a connection to the privately addressed instances, i.e. instances in the private subnet.
Securing the VPC
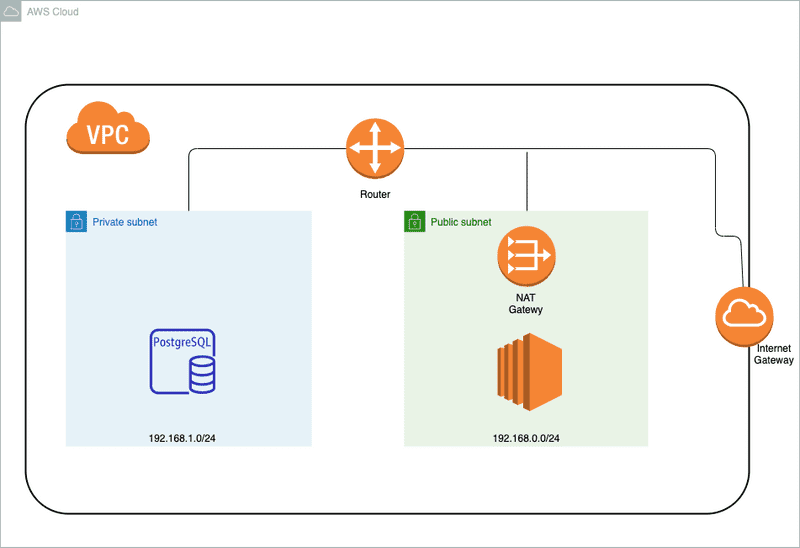
Security groups acts as a virtual firewall that control the flow of traffic between instances in your VPC. Security groups act at the instance level, while Network ACLs act at the subnet level. Network ACLs adds an additional layer of security to your VPC. Below is the big picture of how traffic is controlled in our VPC.
Let’s take an example where the flow of traffic starts at our Internet Gateway. I’m leaving out some of the details of how the traffic reaches the internet gateway on purpose in order simplify our discussion. After traffic reaches the internet gateway, it’s directed to a VPC router. Depending on the routes in the route table, the traffic is either routed to one of our subnets or it gets rejected. As traffic gets routed to a subnet, the Network ACL associated with the subnet inspects the traffic. An example network ACL rule might be something like allow ssh traffic on port 22 to flow through to our subnet only if it originated from a specific subnet.
Creating a security group
A common deployment for a web application is where the frontend is hosted on an EC2 instance in the public subnet and a database is hosted in the private subnet. Let’s assume we want to launch an AWS RDS for PostgreSQL instance in our private subnet.
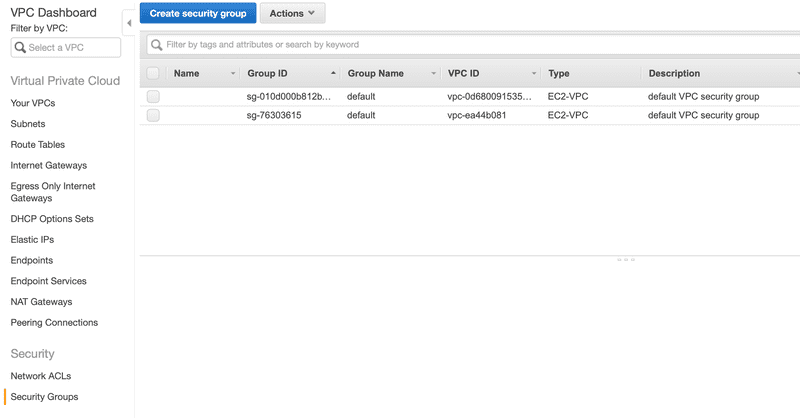
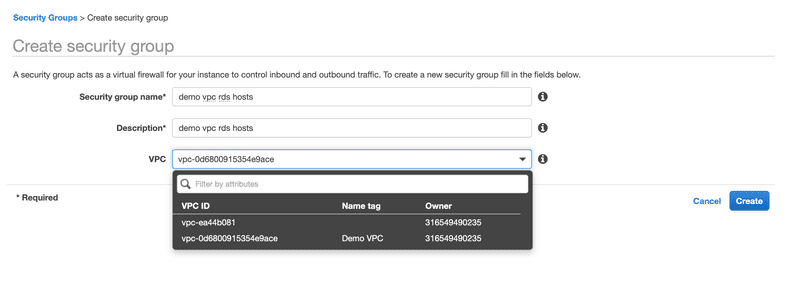
In order to restricts access at the network level to the PostgreSQL instance, we will need to create a security group. We do this by clicking on the Create Security Group from Security Groups in the VPC Dashboard.
We’ll name the security group ‘demo vpc rds hosts’ and we’ll associate it with our Demo VPC.
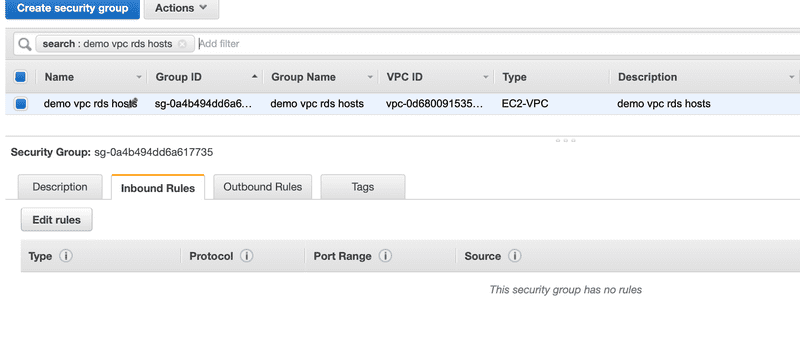
Let’s take a look at the default Inbound Rules and Outbound Rules for the security group we just created.
Inbound Rules
The default behavior for a security group is that no Inbound Rules are defined. This means that nothing is allowed in.
Let’s modify the security group to allow traffic to come in for the PostgreSQL port 5432. We do this by adding a Custom TCP Rule that allows inbound traffic to port 5432 from our public subnet. We can define the source as a CIDR block or another security group. To simplify the example, we’ll enter the source as the CIDR block of the public subnet.
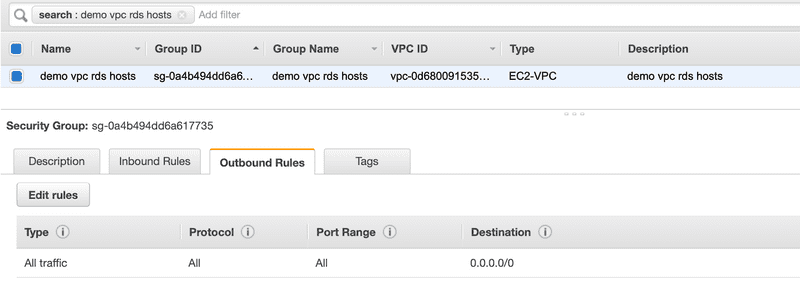
Outbound Rules
The default behavior for a security group is to allow all traffic out. Below is the Outbound Rules for the security group we just created. That’s good enough for now.
Network ACLs
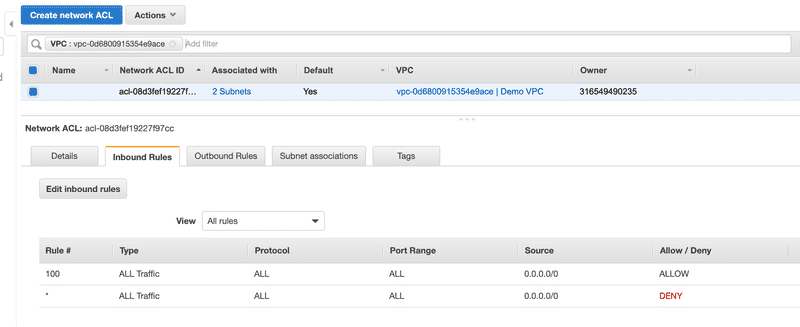
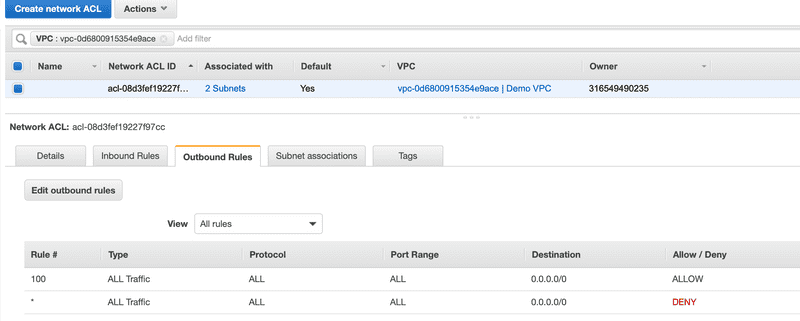
Security groups specify what traffic is allowed to or from an Amazon EC2 instance. Network ACLs evaluates traffic entering and exiting a subnet. Below are the Inbound Rules and Outbound Rules for default Network ACL that’s associated with our subnets in the ‘Demo VPC’. The default network ACL is configured to allow all traffic to flow in and out of the subnets with which it is associated.
Summary
In this two part series, we presented key concepts of VPCs by diving in and creating a VPC. We created a public and private subnet, NAT gateway and internet gateway. We also demonstrated how traffic flows in and out of our VPC by going over route tables, security groups and network ACLs. I’m glad you stuck with me and hoped you learned a thing or two. Knowledge of VPCs is a must when working in AWS.

